Kenny Eliason on Unsplash"} />
### A Primer on `@defer`
Angular's [`@defer`](https://angular.dev/guide/templates/defer) allows developers to delay when a component will be initialized within a component's template, until a [certain condition is met](https://angular.dev/guide/templates/defer#controlling-deferred-content-loading-with-triggers). This could be, when the content enters the viewport, or a user interacts with a specific element, e.t.c.
In our case, we utilize [Angular Material Tabs](https://material.angular.dev/components/tabs/overview) with two tabs displaying two pieces of data:
```html
```
Our `` component may contain data that we don't want to load immediately until we click on that tab. We can wrap it within a `@defer` block to only initialize the component when it enters the viewport:
```html
@defer(on viewport) {
}
```
### Referencing content within `@defer` blocks
If we would like to reference our ``component that contains a property `photoCount()` (`GalleryViewComponent.photoCount`) and use that reference within the same template, we cannot directly use a [template reference variable](https://angular.dev/guide/templates/variables#template-reference-variables) as such:
```html twoslash
@if(tabIndex === 1) {
{{ galleryViewRef.photoCount() }} photos
// [!code focus]
// @error: Will throw error: Property 'photoCount' does not exist on type 'undefined'.
}
@defer(on viewport) {
// [!code focus]
}
```
The above `galleryViewRef.photoCount()` will be undefined.
To properly reference the `` component, we'll utilize the [`viewChild`](https://angular.dev/guide/components/queries#view-queries) in the component's typescript file:
```ts
@Component({
template: `
@if(tabIndex === 1) {
{{ galleryComponent()?.photoCount() }} photos
}
@defer(on viewport) {
}
`
})
export class HomeComponent {
galleryComponent = viewChild('galleryViewRef');
tabIndex = 0;
}
```
Since `viewChild` keeps its result up to date as the application state changes, the variable `galleryComponent` is initially undefined until it inters the viewport.
If a component is wrapped in an `@if` block, it will have the same behavior where a template reference will not have a value. Thus, we'll need to also utilize `viewChild` to reference the content within the `@if` block.
import { Callout } from 'vocs/components'
import { CoverPhoto } from '../../../components/CoverPhoto'
import { AuthorAndDate } from '../../../components/AuthorAndDate'
## The gap between man and machine
Eddie Pipocas on Unsplash"} />
Customer research (my definition):
The skill of asking questions in a search for understanding of user behavior in order make a product that work for the users as well as to discover ways to differenciate the product from the pack.
Being a builder, there's always this singular focus on the thing that I am working on - from how creative/elegant the solutions are to how much of the latest and greatest tools I have used in solutionizing.
And I take some of pride in the development process. Research and design, on the other hand, requires a bit of detatchment from beginning with solutions and instead having a focus on the user and their problems.
It can seem humbling at first to view the user as in fact more knowlegeable than me, a builder, in order to empathize with them and understand their needs. However, as I discover that there's a lot to learn from talking to users, I find that this position quickly becomes empowering. Because I don't have to come up with the answers or a version of a solution that I think will work for a user. Instead, while really listening to a user, the answers lie in plain sight.
As a developer, a lot of job disatisfaction comes from the detachment of the product from the user as I become more enamored by the tools and not see what impact the product is having. A lot of designers (and design researchers), on the other hand, take the time to work with people and are focussed on bridging the gaps in their knowledge.
And this shows at my work where a lot of user-centered people choose to do design and research as well as perform product managerial roles while the developers (builders) want to play with toys and keep building more and more until they outdo each other. While designers tend to the needs of the user, and advocate for them, developers sit in front of their screens pumping out lines of code like our lives depend on it - literally and figuratively.
One of the most important metric working as a developer is the technical impact on a project (or multiple).
This measure inherently pits developers on a scale from most to least impactful, rewarding those who are the most skillful, creative, fast and efficient.
In other words, being able to build the biggest thing is what a developer is meant to do in their career.
Bridging that gap between man and machine is a necessary pursuit, as idealistic as it may be.
Most of the time, we will fail, or get distracted by wanting to use the machine so badly that we will try to adjust ourselves to fit the machines instead of building ones that work for us.
This work requires both good design in all its aspects and development skill to execute the designs.
*Perhaps this is where the gap is.*
import { Callout } from 'vocs/components'
import { CoverPhoto } from '../../../components/CoverPhoto'
import { AuthorAndDate } from '../../../components/AuthorAndDate'
export const {author, authorLink, publishedOn} = frontmatter;
## Utilizing Angular's `provideAppInitializer` to load a module federation remote during application initialization
Takashi Miyazaki on Unsplash"} />
### TLDR:
In a micro-frontend setup with Angular and module federation, we can intercept Angular's bootstraping process to execute code from a remote application before the host application fully initializes using [`provideAppInitializer`](https://angular.dev/api/core/provideAppInitializer).
### Problem Context
Our team works on a micro-frontend Angular application that sits across multiple environments that includes testing, staging and production environments.
These environments all have different environment variables such as api endpoints, cdn urls, e.t.c.
No secrets are stored in these environment files because they are all shipped to the client side.
We utilize NX for our micro-frontend setup which makes the setup easier to manage. The NX docs provides [very good documentation on getting started with NX, Angular and Module Federation.](https://nx.dev/docs/technologies/angular/guides/dynamic-module-federation-with-angular)
During a deployment of our microfrontend to each of the environments, the pipeline swaps out the values in the compiled `environment.ts` file with the appropriate values for each of these environments.
The microfrontend (in our case called `remote-app`) [exposes](https://module-federation.io/configure/exposes.html) two remotes in the `module-federation.config.ts` file:
1. `remoteRoutes` - routes that configure the child routing logic
2. `environment` - the environment file that contains environment variables
Think of a remote as a javascript file that contains a piece of code to be "fetched" by another application.
```ts twoslash
import {ModuleFederationConfig} from '@nx/module-federation';
// ---cut---
const moduleFederationConfig: ModuleFederationConfig = {
name: 'remote-app',
exposes: {
'./remoteRoutes': 'apps/remote-app/src/app/routes.ts',
'./environment': 'apps/remote-app/src/environments/environment.ts',
},
};
```
These remotes can then be fetched from the host application by using the `loadRemote` module federation function from `@module-federation/enhanced/runtime`. i.e.:
```ts twoslash
// [!include ~/snippets/2026/initializing-env-variables-in-ng-mf.ts]
// bootstrap.ts in the host application
import { bootstrapApplication } from '@angular/platform-browser';
import { provideRouter } from '@angular/router';
import { loadRemote } from '@module-federation/enhanced/runtime';
// ---cut---
bootstrapApplication(AppComponent, {
providers: [
provideRouter([
{ path: '', component: HomeComponent },
// @noErrors
/* This loads the remote routes to the applications router such that going to /remoteUrl loads the routes from the microfrontend */
{ path: 'remoteUrl', loadChildren: () => loadRemote('remote-app/remoteRoutes').then(m => m.remoteRoutes)} // [!code focus]
]),
// other providers...
]
})
```
The set up would look like this figuratively:
 This environment file contains mostly environment variables specific to each environment.
These values need to be available at run time.
An example of an environment file would be:
```ts twoslash
export const environment = {
apiUrl: 'https://api-dev.our-app.com/v1.0/',
cdnUrl: 'https://cdn-dev.our-app.com/',
appInsightsUrl: 'https://app-insights-dev.our-app.com/',
} as const
```
This environment file for our microfrontend is hosted on the remote url and so the host application does not know the values at the point of initialization.
The challenge then was how to load this environment file and make it available to the host application when the application starts up (at initialization).
### Utilizing `provideAppInitializer`
Angular provides a way to run async during the boostraping phase through the `provideAppInitializer` that is [provided at the application startup phase](https://angular.dev/api/core/provideAppInitializer).
If an async process is to be run, we can pass this function to be executed in the bootstrap phase and angular will not complete initialization until this async logic completes - an observable completes or a promise resolve.
We would first need to modify how we pass in our environment variables and load them into a service. As well, we would need to define a function to run in the `provideAppInitializer` callback. For our example, we will name our function `initialize()` (but you can choose to call your function something different such as `init` or `setup`):
```ts twoslash
// [!include ~/snippets/2026/app-env-service.ts:appenvservice]
```
Notice here that our environment service contains a function that returns a promise.
This is the function that we would pass into the `provideAppInitializer` function:
***
In the `bootstrap.ts` file for our host application, we can then initialize our `AppEnvService` to set up environment variables:
```ts twoslash
// [!include ~/snippets/2026/initializing-env-variables-in-ng-mf.ts]
// [!include ~/snippets/2026/app-env-service.ts]
import { bootstrapApplication } from '@angular/platform-browser';
import { provideRouter } from '@angular/router';
import { loadRemote } from '@module-federation/enhanced/runtime';
import { provideAppInitializer } from '@angular/core'
// ---cut---
bootstrapApplication(AppComponent, {
providers: [
// Inject the AppEnvironment and call the initialize function
provideAppInitializer(() => inject(AppEnvService).initialize()), // [!code focus]
provideRouter([
{ path: '', component: HomeComponent },
// @noErrors
{ path: 'remoteUrl', loadChildren: () => loadRemote('remote-app/remoteRoutes').then(m => m.routes)}
]),
// other providers...
]
})
```
During the application startup phase, Angular will run this async `AppEnvService.initialize()` function, fetch our environment variables and populate them into our `AppEnvService`.
### Epilogue
The main reason for implementing module federation was because two teams working on various parts of the application wanted to deploy independently.
This is not what micro-frontends were designed for as our micro-frontend does not operate independently.
I do wonder what the [`loadRemote`](https://module-federation.io/guide/basic/runtime/runtime-api#runtime-api) function does specifically under the hood to fetch and load the remote routes, and provides the same angular context as the host application.
Something to investigate further!
## A More Type Safe-ish Angular Router

> Attempting to typing the Angular Router navigation functions (`Router.navigate`; `Router.navigateByUrl`) functions.
### Angular Routing Overview
Routing in Angular is mostly a straight-forward and opinionated when using Angular's build-in routing.
#### Creating Routes
To create routes in Angular, a developer first needs to create an array of type `Array` (`Routes`) and pass the array of routes to the `ApplicationConfig`. The following is a simple routing setup with [static url paths](https://angular.dev/guide/routing/define-routes#static-url-paths)
```ts
import { ApplicationConfig } from '@angular/core'
import { provideRouter, Routes } from '@angular/router'
import { HomeComponent } from '~/components/home/home.ts'
import { DashboardComponent } from '~/components/dashboard/dashboard.ts'
import { AnalyticsComponent } from '~/components/analytics/analytics.ts'
import { ReportsComponent } from '~/components/reports/reports.ts'
import { SettingsComponent } from '~/components/settings/settings.ts'
const routes: Routes = [
{
path: '',
component: HomeComponent,
},
{
path: 'dashboard',
component: DashboardComponent,
children: [
{
path: 'analytics',
component: AnalyticsComponent,
},
{
path: 'reports',
component: ReportsComponent,
},
],
},
{
path: 'settings',
component: SettingsComponent,
},
]
/* Pass Routes to Application Config */
export const appConfig: ApplicationConfig = {
providers: [
//...other providers
provideRouter(routes),
],
}
```
#### Routing Tasks
Within a component, routing can be performed from the component's template or class.
##### Routing from the Component Template
A user might click a link or a button to take them to another page. To be able to perform routing tasks, a developer needs to pass in the `RouterLink` directive into the imports array of the component then use that `routerLink` directive within the template:
```ts
import { RouterLink } from '@angular/router'
@Component({
template: `
`,
imports: [RouterLink, DashboardComponent, SettingsComponent],
})
export class HomeComponent {}
```
##### Routing from within the Component's Class
To perform routing from within a component, a developer needs to inject the `Router` into the component and use either the [`Router.navigate`](https://angular.dev/guide/routing/navigate-to-routes#routernavigate) or the [`Router.navigateByUrl`](https://angular.dev/guide/routing/navigate-to-routes#routernavigatebyurl) functions
The
```ts twoslash
import { Router, ActivatedRoute } from '@angular/router'
import { Component, inject } from '@angular/core'
@Component({ template: '' })
// ---cut---
export class HomeComponent {
router = inject(Router);
activatedRoute = inject(ActivatedRoute);
/* Using Router.navigate */
goToDashboard() {
this.router.navigate(['/dashboard'], {
relativeTo: this.activatedRoute
});
}
/* Using Router.navigateByUrl */
goToSettings() {
this.router.navigateByUrl('/settings');
}
}
```
### Motivation: Why Attempt to Add Types
When calling the Router's `.navigate` or `.navigateByUrl` functions, a developer can pass in a string, any string and the TypeScript compiler will not throw an error. When a user attempts to access a route that doesn't exist, a developer can add a catch all path that catches all routes that don't exist:
```ts twoslash
import { Routes } from '@angular/router';
// ---cut---
const routes: Routes = [
{
path: '**',
redirectTo: '/'
}
]
```
The incentive to add more type-safety to the Router is more on developer ergonomics (DX) while they are writing the code so that they can catch invalid routes at the point where they are writing the code, instead of on the browser, or worse still, when the application is deployed.
For a non-existent route, for instance a call to a non-existent route:
```ts
import { Router } from '@angular/router';
import { Component, inject } from '@angular/core';
@Component({template: ''})
export class SomeComponent {
router = inject(Router)
routeToSomewhere() {
this.router.routeByUrl("non-existent-route");
}
}
```
Should throw an error such as:
!\[\[Screenshot 2025-08-13 at 9.17.07 AM.png]]
In the example above, the type `TRoutePath` is a union type of valid routes. This would help a developer track down the error faster.
### Building Out the Types from the Routes Array
Once the routes array is configured, we need to parse out the routes to a type such as:
```ts twoslash
type TRoutePath = '' | 'dashboard' | 'dashboard/analytics' | 'dashboard/reports' | 'settings'
```
While a developer can manually write down the paths, there will be two places where a developer will have to remember to update whenever the routes change. This is less ideal but may be simple enough for an application with few routes.
A better approach would be to have the routes be the source of truth and the type be generated from this types array. Our approach for this will be to write out a generic type that will take in the routes.
#### Applying `const` Assertion and the `satisfies` operator
The first thing we need to do is to apply [const assertion](https://www.typescriptlang.org/docs/handbook/release-notes/typescript-3-4.html#const-assertions) to the `routes` array and combine it with the [`satisfies` operator](https://www.typescriptlang.org/docs/handbook/release-notes/typescript-4-9.html#the-satisfies-operator) to ensure that our `routes` fulfill the properties needed `Routes` type array:
```ts twoslash
import { Routes } from '@angular/router'
import { Component } from '@angular/core'
@Component({ template: '' })
class DashboardComponent {}
// ---cut---
const routes = [
{
path: 'dashboard',
component: DashboardComponent
}
//... more routes
] as const satisfies Routes
```
The type of routes can then be simplified as:
```ts
type TRoutes = typeof routes;
```
#### Creating a Generic Function to Extract the types
We need a way to extract the types from the `routes` array. A generic type that would take as input the type `TRoutes` and output our union of valid routes.
##### Drafting out the Generic type
One way to think about the generic type is as a function, that takes as input, a type `Route` (a single route) and as output, loops through the children and returns a combination of that route's the children's paths.
If we think of our generic type as a function, that would look like.
```ts
import { Route } from '@angular/router';
function getRoutePaths(route: T, parentPrefix: P) {
/* The base case is where route has no children */
if (!route.children?.length) {
return [route.path]
}
for (const childRoute of route.children) {
return [
...(childRoute.path ? [`${parentPrefix}${childRoute.path}`, childRoute.path] : []),
...getRoutePaths(childRoute, childRoute.path ?? ''),
]
}
}
```
This helps us then build out our generic type which we will call: `TRoutePaths`. Our type takes as input a route, and loops through all the child routes
```ts twoslash
import { Route } from '@angular/router';
// ---cut---
type TRoutePaths =
/* Loop through each of the children - TDeepChild */
TRoute extends { children: infer ChildRoutes extends Route[] }
? /**
* const childrenPaths = getRoutePaths(route, parentRoutePrefix)
* const childPath = route.path
* return childrenPaths + `${parentPrefixRoute}childPath` + childPath
**/
TRoutePaths | `${ParentPrefix}${TRoute['path']}` | TRoute['path']
: /* base case - return the route path */
TRoute extends { path: string }
? `${ParentPrefix}${TRoute['path']}` | TRoute['path']
: never
```
When we apply this to our `TRoutes` to extract out the types, then we have:
```ts twoslash
import { Route, Routes } from '@angular/router';
const routes = [
{
path: '',
},
{
path: 'dashboard',
children: [
{
path: 'analytics',
},
{
path: 'reports',
},
],
},
{
path: 'settings',
},
] as const satisfies Routes;
type TRoutePaths =
/* Loop through each of the children - TDeepChild */
TRoute extends { children: infer ChildRoutes extends Route[] }
? /**
* const childrenPaths = getRoutePaths(route, parentRoutePrefix)
* const childPath = route.path
* return childrenPaths + `${parentPrefixRoute}childPath` + childPath
**/
TRoutePaths | `${ParentPrefix}${TRoute['path']}` | TRoute['path']
: /* base case - return the route path */
TRoute extends { path: string }
? `${ParentPrefix}${TRoute['path']}` | TRoute['path']
: never
// ---cut---
type TRoutes = typeof routes;
type TAppRoutePaths = TRoutePaths
```
The above `TAppRoutePaths` is equivalent to:
```ts twoslash
type TRoutePath = '' | 'dashboard' | 'dashboard/analytics' | 'dashboard/reports' | 'settings'
```
##### Applying our Extracted Type to Angular Router
To extend Angular router functions, we need to extend the `Router.prototype` with two new methods that use our typed routes. We can extend the `@angular/router` module import with our new types using [TypeScript Modules](https://www.typescriptlang.org/docs/handbook/namespaces-and-modules.html#using-modules) and add two new functions `route` and `routeByUrl` that use our `TRoutePath` type.
##### Helper Types
We will need a few helper types to extract out the type of arguments that are passed into the `.navigate` and the `.navigateByUrl` functions:
```ts twoslash
import { Router } from '@angular/router';
// ---cut---
type TRestOfNavigateMoreArgs = Parameters extends [infer Arg, ...infer Rest] ? Rest : never
type TNavigateReturn = ReturnType
type TRestOfNavigateByUrlArgs = Parameters extends [infer Arg, ...infer Rest] ? Rest : never
type TFirstOfNavigateByUrlArgs = Parameters extends [infer Arg, ...infer Rest] ? Exclude : never
type TNavigateByUrlReturn = ReturnType
```
##### Extending `Router.navigate` and `Router.navigateByUrl`
We can then extend the `@angular/router` module by declaring the `Router` interface with our new methods `Router.route` and `Router.routeByUrl` . We then extend the `Router.prototype` and pass in the same methods as the implementation.
```ts
declare module '@angular/router' {
interface Router {
route: (commands: readonly TAppRoutePaths, ...args: TRestOfNavigateMoreArgs) => TNavigateReturn
routeByUrl: (
url: TFirstOfNavigateByUrlArgs | TAppRoutePaths,
...args: TRestOfNavigateByUrlArgs
) => TNavigateByUrlReturn
}
}
Router.prototype.route = Router.prototype.navigate
Router.prototype.routeByUrl = Router.prototype.navigateByUrl
```
And there we have it. If we use these `Router.route` and `Router.routeByUrl` functions, we can then use them in our application:
```ts twoslash
import { Router, Route, Routes } from '@angular/router';
import { inject, Component } from '@angular/core';
const routes = [
{
path: '',
},
{
path: 'dashboard',
children: [
{
path: 'analytics',
},
{
path: 'reports',
},
],
},
{
path: 'settings',
},
] as const satisfies Routes;
type TRoutePaths =
/* Loop through each of the children - TDeepChild */
TRoute extends { children: infer ChildRoutes extends Route[] }
? /**
* const childrenPaths = getRoutePaths(route, parentRoutePrefix)
* const childPath = route.path
* return childrenPaths + `${parentPrefixRoute}childPath` + childPath
**/
TRoutePaths | `${ParentPrefix}${TRoute['path']}` | TRoute['path']
: /* base case - return the route path */
TRoute extends { path: string }
? `${ParentPrefix}${TRoute['path']}` | TRoute['path']
: never
type TRestOfNavigateMoreArgs = Parameters extends [infer Arg, ...infer Rest] ? Rest : never
type TNavigateReturn = ReturnType
type TRestOfNavigateByUrlArgs = Parameters extends [infer Arg, ...infer Rest] ? Rest : never
type TFirstOfNavigateByUrlArgs = Parameters extends [infer Arg, ...infer Rest] ? Exclude : never
type TNavigateByUrlReturn = ReturnType
type TAppRoutePaths = TRoutePaths
declare module '@angular/router' {
interface Router {
route: (commands: readonly TAppRoutePaths[], ...args: TRestOfNavigateMoreArgs) => TNavigateReturn
routeByUrl: (
url: TFirstOfNavigateByUrlArgs | TAppRoutePaths,
...args: TRestOfNavigateByUrlArgs
) => TNavigateByUrlReturn
}
}
Router.prototype.route = Router.prototype.navigate
Router.prototype.routeByUrl = Router.prototype.navigateByUrl
// ---cut---
@Component({ template: '' })
export class SomeComponent {
router = inject(Router)
navigateToDashboard() {
this.router.routeByUrl('dashboard')
}
routeToSomewhereNonExistent() {
// @errors: 2345
this.router.routeByUrl("non-existent-route");
}
}
```
We even have auto-complete in our IDE:
```ts twoslash
import { Router, Route, Routes } from '@angular/router';
import { inject, Component } from '@angular/core';
const routes = [
{
path: '',
},
{
path: 'dashboard',
children: [
{
path: 'analytics',
},
{
path: 'reports',
},
],
},
{
path: 'settings',
},
] as const satisfies Routes;
type TRoutePaths =
/* Loop through each of the children - TDeepChild */
TRoute extends { children: infer ChildRoutes extends Route[] }
? /**
* const childrenPaths = getRoutePaths(route, parentRoutePrefix)
* const childPath = route.path
* return childrenPaths + `${parentPrefixRoute}childPath` + childPath
**/
TRoutePaths | `${ParentPrefix}${TRoute['path']}` | TRoute['path']
: /* base case - return the route path */
TRoute extends { path: string }
? `${ParentPrefix}${TRoute['path']}` | TRoute['path']
: never
type TRestOfNavigateMoreArgs = Parameters extends [infer Arg, ...infer Rest] ? Rest : never
type TNavigateReturn = ReturnType
type TRestOfNavigateByUrlArgs = Parameters extends [infer Arg, ...infer Rest] ? Rest : never
type TFirstOfNavigateByUrlArgs = Parameters extends [infer Arg, ...infer Rest] ? Exclude : never
type TNavigateByUrlReturn = ReturnType
type TAppRoutePaths = TRoutePaths
declare module '@angular/router' {
interface Router {
route: (commands: readonly TAppRoutePaths[], ...args: TRestOfNavigateMoreArgs) => TNavigateReturn
routeByUrl: (
url: TFirstOfNavigateByUrlArgs | TAppRoutePaths,
...args: TRestOfNavigateByUrlArgs
) => TNavigateByUrlReturn
}
}
Router.prototype.route = Router.prototype.navigate
Router.prototype.routeByUrl = Router.prototype.navigateByUrl
// ---cut-before---
@Component({template: ''})
export class SomeComponent {
router = inject(Router)
navigateToDashboard() {
// @noErrors
this.router.routeByUrl("
// ^|
}
}
```
We now have type-checking on our paths which was our goal at the beginning.
### More Complex Scenarios
Our Router now handles the basic routing scenarios with static route URLs. However, and **realistically**, most applications pass in route and query parameters. An example would look like:
```ts
const routes: Routes = [
{
path: 'dashboard',
component: DashboardComponent,
children: [
{
path: 'reports',
component: ReportsComponent,
children: [
{
path: ':id',
component: SingleReportComponent,
},
]
},
],
},
// Other routes
]
```
To access the `SingleReportComponent`, we need to pass in the the `id` to the `Router`'s navigation functions. Our implementation so far does not handle the parameters.
### Limitations
Even though most applications have more complex routing requirements, this was an attempt at making the router a bit more type-safe for simple use-cases.
However, there are several limitations of this implementation such as:
1. This implementation relies on the underlying Angular router API. Changes to the function arguments (`Router.navigate` and `Router.navigateByUrl`) can break the types.
2. The above implementation so far only handles routes with static URLs. Since we don't know the shape of the route params beforehand - the parameters can be any string. When we perform a union of this generated type with `string` , the output is a `string`.
## Experimenting and viewing work as a play and Three Lessons from the Year

This past week I merged a pull request containing the last set of features that my team is planning to ship this year. Getting through this chunk of work got me thinking about some of the ideas and patterns that have made my work feel more satisfying this year. A lot of my day to day work involves tinkering with ideas, patterns, and trying out different approaches to solve technical challenges. And when all the pieces come together and we release the work to our users, I am happy to get validation of our teams' efforts throughout the way.
Here are three things that I have applied that have been helpful in making my work this year:
### 1. signing up to experiment and try out new ideas
When the team brings up a challenge to me that I haven't encountered before or don't know how to solve, I never say that it cannot be done or we do not have the skillset for it if I at least have not attempted to do my own research and consulted my colleagues on the topic. At work we call such investigative and open-ended work a spike. I love doing such work because they push me to explore unfamiliar territory. And almost 100% of the time I learn something new that later finds its way into a feature or a way of improving an already-existing implementation. Doing this has delivered the most compounding of learnings over time as I have applied the lessons in work that has come later in the year.
### 2. solve the hardest problem first
Usually when tackling a large-enough project, there's always one or two core technical challenges that make up a big chunk of the work to be done. These usually need more time commitment and tend to present an opportunity for learning something new. Getting to the core problems faster through rapid prototyping has helped me utilize my energy well by solving the most technically challenging problems when I have the most drive and energy. The rest of the work is mostly patching up the solutions to the core problems and cleaning out the rough edges.
### 3. understanding how I work best
For me, short bursts of getting several low-stakes tasks done paired with longer projects where I can focus days and even a week or more on is usually a good balance. For larger projects, I have found that I tend to shut out everything else when working on something and let it simmer and occupy my mind as I make progress. Then I can keep a steady rhythm of high focus until I get the work through the door.
***
These are a few of the main lessons that underlined my work this year and hope to keep building upon.
import { Callout } from 'vocs/components'
import { CoverPhoto } from '../../../components/CoverPhoto'
import { SpotifyTrack } from '../../../components/SpotifyTrack'
## Intermittent Sleep & Rediscovering Learning
There is Gorée where my heart of hearts bleeds,
This environment file contains mostly environment variables specific to each environment.
These values need to be available at run time.
An example of an environment file would be:
```ts twoslash
export const environment = {
apiUrl: 'https://api-dev.our-app.com/v1.0/',
cdnUrl: 'https://cdn-dev.our-app.com/',
appInsightsUrl: 'https://app-insights-dev.our-app.com/',
} as const
```
This environment file for our microfrontend is hosted on the remote url and so the host application does not know the values at the point of initialization.
The challenge then was how to load this environment file and make it available to the host application when the application starts up (at initialization).
### Utilizing `provideAppInitializer`
Angular provides a way to run async during the boostraping phase through the `provideAppInitializer` that is [provided at the application startup phase](https://angular.dev/api/core/provideAppInitializer).
If an async process is to be run, we can pass this function to be executed in the bootstrap phase and angular will not complete initialization until this async logic completes - an observable completes or a promise resolve.
We would first need to modify how we pass in our environment variables and load them into a service. As well, we would need to define a function to run in the `provideAppInitializer` callback. For our example, we will name our function `initialize()` (but you can choose to call your function something different such as `init` or `setup`):
```ts twoslash
// [!include ~/snippets/2026/app-env-service.ts:appenvservice]
```
Notice here that our environment service contains a function that returns a promise.
This is the function that we would pass into the `provideAppInitializer` function:
***
In the `bootstrap.ts` file for our host application, we can then initialize our `AppEnvService` to set up environment variables:
```ts twoslash
// [!include ~/snippets/2026/initializing-env-variables-in-ng-mf.ts]
// [!include ~/snippets/2026/app-env-service.ts]
import { bootstrapApplication } from '@angular/platform-browser';
import { provideRouter } from '@angular/router';
import { loadRemote } from '@module-federation/enhanced/runtime';
import { provideAppInitializer } from '@angular/core'
// ---cut---
bootstrapApplication(AppComponent, {
providers: [
// Inject the AppEnvironment and call the initialize function
provideAppInitializer(() => inject(AppEnvService).initialize()), // [!code focus]
provideRouter([
{ path: '', component: HomeComponent },
// @noErrors
{ path: 'remoteUrl', loadChildren: () => loadRemote('remote-app/remoteRoutes').then(m => m.routes)}
]),
// other providers...
]
})
```
During the application startup phase, Angular will run this async `AppEnvService.initialize()` function, fetch our environment variables and populate them into our `AppEnvService`.
### Epilogue
The main reason for implementing module federation was because two teams working on various parts of the application wanted to deploy independently.
This is not what micro-frontends were designed for as our micro-frontend does not operate independently.
I do wonder what the [`loadRemote`](https://module-federation.io/guide/basic/runtime/runtime-api#runtime-api) function does specifically under the hood to fetch and load the remote routes, and provides the same angular context as the host application.
Something to investigate further!
## A More Type Safe-ish Angular Router

> Attempting to typing the Angular Router navigation functions (`Router.navigate`; `Router.navigateByUrl`) functions.
### Angular Routing Overview
Routing in Angular is mostly a straight-forward and opinionated when using Angular's build-in routing.
#### Creating Routes
To create routes in Angular, a developer first needs to create an array of type `Array` (`Routes`) and pass the array of routes to the `ApplicationConfig`. The following is a simple routing setup with [static url paths](https://angular.dev/guide/routing/define-routes#static-url-paths)
```ts
import { ApplicationConfig } from '@angular/core'
import { provideRouter, Routes } from '@angular/router'
import { HomeComponent } from '~/components/home/home.ts'
import { DashboardComponent } from '~/components/dashboard/dashboard.ts'
import { AnalyticsComponent } from '~/components/analytics/analytics.ts'
import { ReportsComponent } from '~/components/reports/reports.ts'
import { SettingsComponent } from '~/components/settings/settings.ts'
const routes: Routes = [
{
path: '',
component: HomeComponent,
},
{
path: 'dashboard',
component: DashboardComponent,
children: [
{
path: 'analytics',
component: AnalyticsComponent,
},
{
path: 'reports',
component: ReportsComponent,
},
],
},
{
path: 'settings',
component: SettingsComponent,
},
]
/* Pass Routes to Application Config */
export const appConfig: ApplicationConfig = {
providers: [
//...other providers
provideRouter(routes),
],
}
```
#### Routing Tasks
Within a component, routing can be performed from the component's template or class.
##### Routing from the Component Template
A user might click a link or a button to take them to another page. To be able to perform routing tasks, a developer needs to pass in the `RouterLink` directive into the imports array of the component then use that `routerLink` directive within the template:
```ts
import { RouterLink } from '@angular/router'
@Component({
template: `
`,
imports: [RouterLink, DashboardComponent, SettingsComponent],
})
export class HomeComponent {}
```
##### Routing from within the Component's Class
To perform routing from within a component, a developer needs to inject the `Router` into the component and use either the [`Router.navigate`](https://angular.dev/guide/routing/navigate-to-routes#routernavigate) or the [`Router.navigateByUrl`](https://angular.dev/guide/routing/navigate-to-routes#routernavigatebyurl) functions
The
```ts twoslash
import { Router, ActivatedRoute } from '@angular/router'
import { Component, inject } from '@angular/core'
@Component({ template: '' })
// ---cut---
export class HomeComponent {
router = inject(Router);
activatedRoute = inject(ActivatedRoute);
/* Using Router.navigate */
goToDashboard() {
this.router.navigate(['/dashboard'], {
relativeTo: this.activatedRoute
});
}
/* Using Router.navigateByUrl */
goToSettings() {
this.router.navigateByUrl('/settings');
}
}
```
### Motivation: Why Attempt to Add Types
When calling the Router's `.navigate` or `.navigateByUrl` functions, a developer can pass in a string, any string and the TypeScript compiler will not throw an error. When a user attempts to access a route that doesn't exist, a developer can add a catch all path that catches all routes that don't exist:
```ts twoslash
import { Routes } from '@angular/router';
// ---cut---
const routes: Routes = [
{
path: '**',
redirectTo: '/'
}
]
```
The incentive to add more type-safety to the Router is more on developer ergonomics (DX) while they are writing the code so that they can catch invalid routes at the point where they are writing the code, instead of on the browser, or worse still, when the application is deployed.
For a non-existent route, for instance a call to a non-existent route:
```ts
import { Router } from '@angular/router';
import { Component, inject } from '@angular/core';
@Component({template: ''})
export class SomeComponent {
router = inject(Router)
routeToSomewhere() {
this.router.routeByUrl("non-existent-route");
}
}
```
Should throw an error such as:
!\[\[Screenshot 2025-08-13 at 9.17.07 AM.png]]
In the example above, the type `TRoutePath` is a union type of valid routes. This would help a developer track down the error faster.
### Building Out the Types from the Routes Array
Once the routes array is configured, we need to parse out the routes to a type such as:
```ts twoslash
type TRoutePath = '' | 'dashboard' | 'dashboard/analytics' | 'dashboard/reports' | 'settings'
```
While a developer can manually write down the paths, there will be two places where a developer will have to remember to update whenever the routes change. This is less ideal but may be simple enough for an application with few routes.
A better approach would be to have the routes be the source of truth and the type be generated from this types array. Our approach for this will be to write out a generic type that will take in the routes.
#### Applying `const` Assertion and the `satisfies` operator
The first thing we need to do is to apply [const assertion](https://www.typescriptlang.org/docs/handbook/release-notes/typescript-3-4.html#const-assertions) to the `routes` array and combine it with the [`satisfies` operator](https://www.typescriptlang.org/docs/handbook/release-notes/typescript-4-9.html#the-satisfies-operator) to ensure that our `routes` fulfill the properties needed `Routes` type array:
```ts twoslash
import { Routes } from '@angular/router'
import { Component } from '@angular/core'
@Component({ template: '' })
class DashboardComponent {}
// ---cut---
const routes = [
{
path: 'dashboard',
component: DashboardComponent
}
//... more routes
] as const satisfies Routes
```
The type of routes can then be simplified as:
```ts
type TRoutes = typeof routes;
```
#### Creating a Generic Function to Extract the types
We need a way to extract the types from the `routes` array. A generic type that would take as input the type `TRoutes` and output our union of valid routes.
##### Drafting out the Generic type
One way to think about the generic type is as a function, that takes as input, a type `Route` (a single route) and as output, loops through the children and returns a combination of that route's the children's paths.
If we think of our generic type as a function, that would look like.
```ts
import { Route } from '@angular/router';
function getRoutePaths(route: T, parentPrefix: P) {
/* The base case is where route has no children */
if (!route.children?.length) {
return [route.path]
}
for (const childRoute of route.children) {
return [
...(childRoute.path ? [`${parentPrefix}${childRoute.path}`, childRoute.path] : []),
...getRoutePaths(childRoute, childRoute.path ?? ''),
]
}
}
```
This helps us then build out our generic type which we will call: `TRoutePaths`. Our type takes as input a route, and loops through all the child routes
```ts twoslash
import { Route } from '@angular/router';
// ---cut---
type TRoutePaths =
/* Loop through each of the children - TDeepChild */
TRoute extends { children: infer ChildRoutes extends Route[] }
? /**
* const childrenPaths = getRoutePaths(route, parentRoutePrefix)
* const childPath = route.path
* return childrenPaths + `${parentPrefixRoute}childPath` + childPath
**/
TRoutePaths | `${ParentPrefix}${TRoute['path']}` | TRoute['path']
: /* base case - return the route path */
TRoute extends { path: string }
? `${ParentPrefix}${TRoute['path']}` | TRoute['path']
: never
```
When we apply this to our `TRoutes` to extract out the types, then we have:
```ts twoslash
import { Route, Routes } from '@angular/router';
const routes = [
{
path: '',
},
{
path: 'dashboard',
children: [
{
path: 'analytics',
},
{
path: 'reports',
},
],
},
{
path: 'settings',
},
] as const satisfies Routes;
type TRoutePaths =
/* Loop through each of the children - TDeepChild */
TRoute extends { children: infer ChildRoutes extends Route[] }
? /**
* const childrenPaths = getRoutePaths(route, parentRoutePrefix)
* const childPath = route.path
* return childrenPaths + `${parentPrefixRoute}childPath` + childPath
**/
TRoutePaths | `${ParentPrefix}${TRoute['path']}` | TRoute['path']
: /* base case - return the route path */
TRoute extends { path: string }
? `${ParentPrefix}${TRoute['path']}` | TRoute['path']
: never
// ---cut---
type TRoutes = typeof routes;
type TAppRoutePaths = TRoutePaths
```
The above `TAppRoutePaths` is equivalent to:
```ts twoslash
type TRoutePath = '' | 'dashboard' | 'dashboard/analytics' | 'dashboard/reports' | 'settings'
```
##### Applying our Extracted Type to Angular Router
To extend Angular router functions, we need to extend the `Router.prototype` with two new methods that use our typed routes. We can extend the `@angular/router` module import with our new types using [TypeScript Modules](https://www.typescriptlang.org/docs/handbook/namespaces-and-modules.html#using-modules) and add two new functions `route` and `routeByUrl` that use our `TRoutePath` type.
##### Helper Types
We will need a few helper types to extract out the type of arguments that are passed into the `.navigate` and the `.navigateByUrl` functions:
```ts twoslash
import { Router } from '@angular/router';
// ---cut---
type TRestOfNavigateMoreArgs = Parameters extends [infer Arg, ...infer Rest] ? Rest : never
type TNavigateReturn = ReturnType
type TRestOfNavigateByUrlArgs = Parameters extends [infer Arg, ...infer Rest] ? Rest : never
type TFirstOfNavigateByUrlArgs = Parameters extends [infer Arg, ...infer Rest] ? Exclude : never
type TNavigateByUrlReturn = ReturnType
```
##### Extending `Router.navigate` and `Router.navigateByUrl`
We can then extend the `@angular/router` module by declaring the `Router` interface with our new methods `Router.route` and `Router.routeByUrl` . We then extend the `Router.prototype` and pass in the same methods as the implementation.
```ts
declare module '@angular/router' {
interface Router {
route: (commands: readonly TAppRoutePaths, ...args: TRestOfNavigateMoreArgs) => TNavigateReturn
routeByUrl: (
url: TFirstOfNavigateByUrlArgs | TAppRoutePaths,
...args: TRestOfNavigateByUrlArgs
) => TNavigateByUrlReturn
}
}
Router.prototype.route = Router.prototype.navigate
Router.prototype.routeByUrl = Router.prototype.navigateByUrl
```
And there we have it. If we use these `Router.route` and `Router.routeByUrl` functions, we can then use them in our application:
```ts twoslash
import { Router, Route, Routes } from '@angular/router';
import { inject, Component } from '@angular/core';
const routes = [
{
path: '',
},
{
path: 'dashboard',
children: [
{
path: 'analytics',
},
{
path: 'reports',
},
],
},
{
path: 'settings',
},
] as const satisfies Routes;
type TRoutePaths =
/* Loop through each of the children - TDeepChild */
TRoute extends { children: infer ChildRoutes extends Route[] }
? /**
* const childrenPaths = getRoutePaths(route, parentRoutePrefix)
* const childPath = route.path
* return childrenPaths + `${parentPrefixRoute}childPath` + childPath
**/
TRoutePaths | `${ParentPrefix}${TRoute['path']}` | TRoute['path']
: /* base case - return the route path */
TRoute extends { path: string }
? `${ParentPrefix}${TRoute['path']}` | TRoute['path']
: never
type TRestOfNavigateMoreArgs = Parameters extends [infer Arg, ...infer Rest] ? Rest : never
type TNavigateReturn = ReturnType
type TRestOfNavigateByUrlArgs = Parameters extends [infer Arg, ...infer Rest] ? Rest : never
type TFirstOfNavigateByUrlArgs = Parameters extends [infer Arg, ...infer Rest] ? Exclude : never
type TNavigateByUrlReturn = ReturnType
type TAppRoutePaths = TRoutePaths
declare module '@angular/router' {
interface Router {
route: (commands: readonly TAppRoutePaths[], ...args: TRestOfNavigateMoreArgs) => TNavigateReturn
routeByUrl: (
url: TFirstOfNavigateByUrlArgs | TAppRoutePaths,
...args: TRestOfNavigateByUrlArgs
) => TNavigateByUrlReturn
}
}
Router.prototype.route = Router.prototype.navigate
Router.prototype.routeByUrl = Router.prototype.navigateByUrl
// ---cut---
@Component({ template: '' })
export class SomeComponent {
router = inject(Router)
navigateToDashboard() {
this.router.routeByUrl('dashboard')
}
routeToSomewhereNonExistent() {
// @errors: 2345
this.router.routeByUrl("non-existent-route");
}
}
```
We even have auto-complete in our IDE:
```ts twoslash
import { Router, Route, Routes } from '@angular/router';
import { inject, Component } from '@angular/core';
const routes = [
{
path: '',
},
{
path: 'dashboard',
children: [
{
path: 'analytics',
},
{
path: 'reports',
},
],
},
{
path: 'settings',
},
] as const satisfies Routes;
type TRoutePaths =
/* Loop through each of the children - TDeepChild */
TRoute extends { children: infer ChildRoutes extends Route[] }
? /**
* const childrenPaths = getRoutePaths(route, parentRoutePrefix)
* const childPath = route.path
* return childrenPaths + `${parentPrefixRoute}childPath` + childPath
**/
TRoutePaths | `${ParentPrefix}${TRoute['path']}` | TRoute['path']
: /* base case - return the route path */
TRoute extends { path: string }
? `${ParentPrefix}${TRoute['path']}` | TRoute['path']
: never
type TRestOfNavigateMoreArgs = Parameters extends [infer Arg, ...infer Rest] ? Rest : never
type TNavigateReturn = ReturnType
type TRestOfNavigateByUrlArgs = Parameters extends [infer Arg, ...infer Rest] ? Rest : never
type TFirstOfNavigateByUrlArgs = Parameters extends [infer Arg, ...infer Rest] ? Exclude : never
type TNavigateByUrlReturn = ReturnType
type TAppRoutePaths = TRoutePaths
declare module '@angular/router' {
interface Router {
route: (commands: readonly TAppRoutePaths[], ...args: TRestOfNavigateMoreArgs) => TNavigateReturn
routeByUrl: (
url: TFirstOfNavigateByUrlArgs | TAppRoutePaths,
...args: TRestOfNavigateByUrlArgs
) => TNavigateByUrlReturn
}
}
Router.prototype.route = Router.prototype.navigate
Router.prototype.routeByUrl = Router.prototype.navigateByUrl
// ---cut-before---
@Component({template: ''})
export class SomeComponent {
router = inject(Router)
navigateToDashboard() {
// @noErrors
this.router.routeByUrl("
// ^|
}
}
```
We now have type-checking on our paths which was our goal at the beginning.
### More Complex Scenarios
Our Router now handles the basic routing scenarios with static route URLs. However, and **realistically**, most applications pass in route and query parameters. An example would look like:
```ts
const routes: Routes = [
{
path: 'dashboard',
component: DashboardComponent,
children: [
{
path: 'reports',
component: ReportsComponent,
children: [
{
path: ':id',
component: SingleReportComponent,
},
]
},
],
},
// Other routes
]
```
To access the `SingleReportComponent`, we need to pass in the the `id` to the `Router`'s navigation functions. Our implementation so far does not handle the parameters.
### Limitations
Even though most applications have more complex routing requirements, this was an attempt at making the router a bit more type-safe for simple use-cases.
However, there are several limitations of this implementation such as:
1. This implementation relies on the underlying Angular router API. Changes to the function arguments (`Router.navigate` and `Router.navigateByUrl`) can break the types.
2. The above implementation so far only handles routes with static URLs. Since we don't know the shape of the route params beforehand - the parameters can be any string. When we perform a union of this generated type with `string` , the output is a `string`.
## Experimenting and viewing work as a play and Three Lessons from the Year

This past week I merged a pull request containing the last set of features that my team is planning to ship this year. Getting through this chunk of work got me thinking about some of the ideas and patterns that have made my work feel more satisfying this year. A lot of my day to day work involves tinkering with ideas, patterns, and trying out different approaches to solve technical challenges. And when all the pieces come together and we release the work to our users, I am happy to get validation of our teams' efforts throughout the way.
Here are three things that I have applied that have been helpful in making my work this year:
### 1. signing up to experiment and try out new ideas
When the team brings up a challenge to me that I haven't encountered before or don't know how to solve, I never say that it cannot be done or we do not have the skillset for it if I at least have not attempted to do my own research and consulted my colleagues on the topic. At work we call such investigative and open-ended work a spike. I love doing such work because they push me to explore unfamiliar territory. And almost 100% of the time I learn something new that later finds its way into a feature or a way of improving an already-existing implementation. Doing this has delivered the most compounding of learnings over time as I have applied the lessons in work that has come later in the year.
### 2. solve the hardest problem first
Usually when tackling a large-enough project, there's always one or two core technical challenges that make up a big chunk of the work to be done. These usually need more time commitment and tend to present an opportunity for learning something new. Getting to the core problems faster through rapid prototyping has helped me utilize my energy well by solving the most technically challenging problems when I have the most drive and energy. The rest of the work is mostly patching up the solutions to the core problems and cleaning out the rough edges.
### 3. understanding how I work best
For me, short bursts of getting several low-stakes tasks done paired with longer projects where I can focus days and even a week or more on is usually a good balance. For larger projects, I have found that I tend to shut out everything else when working on something and let it simmer and occupy my mind as I make progress. Then I can keep a steady rhythm of high focus until I get the work through the door.
***
These are a few of the main lessons that underlined my work this year and hope to keep building upon.
import { Callout } from 'vocs/components'
import { CoverPhoto } from '../../../components/CoverPhoto'
import { SpotifyTrack } from '../../../components/SpotifyTrack'
## Intermittent Sleep & Rediscovering Learning
There is Gorée where my heart of hearts bleeds,
The house of red basalt brick to the right,
The little red house in the middle, between two gulfs
Of shadow and light.
- From the poem It's Five O'Clock, by Léopold Sedar Senghor
Several times this week sleep evaded me.
And I stared into the darkness.
I’ve been struggling to sleep lately and I’m unsure if it’s because of the change in season or my body is trying to tell me something.
This has been happening for the past couple of weeks and hopefully I’ll be able to find some good sleep rhythms into the fall.
I took up learning C# and DotNet since I feel fairly competent and comfortable with Angular/TS to the point where I wasn’t feeling like I was growing or being pushed into a challenge (at work).
There’s something about trying to push my own boundaries at the workplace where it seems as if I have to be the one who redefine my own and other’s understanding of what I can do.
People know I can do A but I want to do A and B so I have to build a level of confidence in doing the new thing that I am learning.
And I feel myself at times wanting to go back that well-defined understanding of my role (focussing on the UI) — because it is familiar and comfortable.
However, I am allowing myself to change and grow.
So far I have had to do these learnings in my own time and at my own pace and the more I push into this new foray, the more I remind myself that I need to pay attention to how I am learning, and what I am learning about myself and others.
No one will hold my hand (per say) and I find myself having to curve out my own space in the workplace.
#### Learnings over September 🕵🏾♂️
##### Improving List Rendering Performance using Angular Material CDK Virtual Scrolling
Angular Material CDK provides an api for rendering large lists that improves performance when an application has to render many items on a list.
We had a situation where we loaded some data and rendering this with the traditional `ngFor` directive would lead to slow performance and in some cases the entire browser would not respond.
I used [Virtual Scrolling](https://material.angular.io/cdk/scrolling/overview#virtual-scrolling) from Material CDK this to improve an application’s responsiveness and performance drastically.
##### Auxilliary Routes in Angular
I was doing some research on if Angular can handle multiple routers for example, in the case where you have a dialog that you would like to route but have the dialog’s routing be independent from the primary application router.
This is possible through [named routes in Angular](https://v17.angular.io/guide/router-tutorial-toh#displaying-multiple-routes-in-named-outlets).
I might do a more in-depth post on this to explore the use cases and drawbacks.
***
## A Freshman at NgConf 2023

In most of my work and experience builiding applications from my home office, days can morph into weeks of solo-work with the occasional pair programming sessions and routine standup meetings.
To that end, I can admit that I was anxious and very much naive to the craft of attending a developer conference which seemed to me to lie at the center of networking with other developers, learning what's new in the Angular space and meeting speakers and sponsors.
The Angular Framework is advancing and keeping up by walking the fine line of adopting new features and bringing the community along in the process.
For developers new to the framework, Angular is trying to be more approachable by adding new features such as standalone components that make it easier to bootstrap an Angular application.
More experienced developers are also more excited by the push to embrace features that improve parts of the framework such as hydration, reactivity and performance.
Suffice to say, the conference showcased the bleeding-edge of what the Angular team and community are doing to push the framework and the web in general forward.
The turnout fielded developers from small and large teams as well as those who had just began working in Angular to those who have been there from the Angular.js days.
So what did I take out of the conference?
I learned something new about the framework - how to use auxilliary routes in Angular and how to type the `ngTemplateOutletContext` directive.
Speaking during breakfast and lunch with developers working in different contexts with Angular, there was this general feeling of excitement about how the framework continually enabled them to build better applications for their users while improving the developer experience(DX) with each release as the framework is embracing tooling from the community such by:
* integrating tools such as [Vite and esbuild](https://angular.io/guide/esbuild) that speed up local development and the build process
* embracing more modern testing tools by integrating [jest support and migrating away from Karma to Web Test Runner](https://blog.angular.io/moving-angular-cli-to-jest-and-web-test-runner-ef85ef69ceca) as well as having support for community tooling in [Cypress](https://docs.cypress.io/guides/component-testing/angular/overview)
* [improving the hydration process](https://angular.io/guide/hydration) for server side rendered applications
Can Angular be exciting? I don't know if that's even the right question to ask.
As more applications are getting older with time, can Angular provide a platform where developers can not only maintain those older applcations but improve them with each new version of Angular? More so, can Angular be the framework of choice for developers building new applications? These seem to be deeper questions that the community is tackling.
The work to improve the framework is continuing with improvements on reactivity, performance and hydration just to name a few areas where work is already in progress.
I left the conference a lot more hopeful and excited to get back to work with my team through the various problems that software development teams face each day.
As much as a lot of grunt work is needed, software delivery teams are people who work in specific group and individual contexts.
The more important lessons from the conference were how to contribute more effectively to the success of my team as we build the various products to meet business needs with the knowledge that the tools out there are meant to help us along the way.
***
[Notes from the conference can be found here](https://github.com/laudebugs/conference-notes/blob/main/conferences/ngconf/ngconf-2023.md)
import { StackBlitzEmbed } from '../../../components/StackBlitzEmbed'
import { SpotifyTrack } from '../../../components/SpotifyTrack'
## Guarding against Unsaved Changes in Angular Apps using Route Guards

We’ve all sometimes mistakingly closed a document editor with a paragraph or two of unsaved edits, or that browser tab where we were drafting an email. Most of the time, when we attempt to navigate away to other parts of these applications, we get a reminder through a dialog box that we have some information that hasn’t yet been synced in the cloud (if the particular app in question even has an autosave feature).
Within Angular applications, we can leverage the `CanDeactivate` interface to implement a route guard which can then be added to the [route’s `canDeactivate` property](https://angular.io/api/router/Route#properties) to notify a user that they have unsaved changes in their app.
### Defining the Component that can deactivate navigation
:::tip
The `CanDeactivate` is an interface that a component has to implement that allows it to “intercept” navigation calls and cancel or proceed with navigation.
:::
The component that checks whether navigation can proceed or be cancelled contains a function, `canDeactivate`, that can be called in the route guard to check whether or not navigation away from the component or page can continue or be cancelled.
An interface can be defined which will be implemented by our component. The function to be called can have one of the following return types:
```tsx
type CanDeactivateFn = (...args: any[]) => Observable | Promise | boolean | UrlTree;
```
In our case, we’ll stick to `boolean | Observable`. Our component will call it’s `canDeactivate` function and return `boolean | Observable` depending on whatever checks the component runs to determine this.
So we have as our interface:
```tsx
// deactivatable-component.interface.ts
export interface DeactivatableComponent {
canDeactivate: () => boolean | Observable
}
```
We can now implement this interface in a component. Assuming we have a form page that would possibly contains unsaved changes, the component has the following functions:
* `containsUnsavedChanges` - a function that returns `true` or `false` checking if the form values have been saved by the user. This implementation could be enhanced to fit any use case — even checking the server for unsaved changes or invalid values and so forth
* `ngAfterViewInit` - this is a life cycle hook that updates the form with the values saved in local storage. These values could be updated from the state and/or the database
* `save` - this function updates the state when the user clicks the “Save” button.
* `canDeactivate` - this is our implementation of the `CanDeactivate` interface that our component implements. This function checks whether changes have been saved when a user tries to navigate away from the page, and if not, opens a dialog to confirm whether the user would like to proceed with or without saving the changes
```tsx
import { AfterContentInit, Component, ViewChild } from '@angular/core'
import { NgForm } from '@angular/forms'
import { MatDialog } from '@angular/material/dialog'
import { tap } from 'rxjs'
import { CoreModule } from '../../core/core.module'
import { DeactivatableComponent } from '../../unsaved-changes.guard'
import { UnsavedChangesDialog } from '../unsaved-changes-dialog.component'
@Component({
standalone: true,
imports: [CoreModule],
templateUrl: './favorites-form.component.html',
styles: [
`
h1{
text-align: center;
}
form{
margin: 1em;
display: grid;
gap: 1em;
}
footer{
display: flex;
justify-content: center;
align-items: center;
flex-direction: column;
}
.unsaved-changes{
margin-bottom: 0.5em;
}
`,
],
})
export FormComponent implements DeactivatableComponent{
/** Our favorites object to save changes */
private favorites = { movie: '', tvShow: '' }
/** Read the form from the Template */
@ViewChild('FavoritesForm', { static: true }) favoritesForm!: NgForm
constructor(private dialog: MatDialog) {}
ngAfterContentInit() {
/** We need to check the next tick since the controls are not registered yet */
setTimeout(() =>
this.favoritesForm.setValue(JSON.parse(window.localStorage?.getItem('favorites')) ?? this.favorites)
)
this.favorites = JSON.parse(window.localStorage?.getItem('favorites')) ?? this.favorites
}
/**
* Checks whether the form contains unsaved changes
*/
containsUnsavedChanges() {
return Object.keys(this.favorites)
.map((key) => this.favoritesForm.value[key] === this.favorites[key])
.some((value) => !value)
}
/**
* Updates the favorites object and saves it to local storage
*/
save() {
this.favorites = { ...this.favoritesForm.value }
window.localStorage.setItem('favorites', JSON.stringify(this.favorites))
}
/**
* If changes are not saved, a dialog is opened to confirm with the user
* that they want to proceed without saving
*/
canDeactivate() {
if (!this.containsUnsavedChanges()) {
return true
} else {
return this.dialog.open(UnsavedChangesDialog).afterClosed()
}
}}
}
```
Here would be the template for this component:
```html
Favourite Movies & TV Shows
```
As one can infer from the form, if the user doesn’t save changes, then a dialog will be opened to confirm whether the user would like to save the changes or not
### Implementing the CanDeactivate guard
There are two ways of writing route guards in Angular. Either a class that implements the `CanDeactivate` interface or a function with [the `CanDeactivateFn` signature.](https://angular.io/api/router/CanDeactivateFn)
1. Implementing the guard as a function
As of Angular 14.2, Functional Route guards were introduced as a way to simplify the writing and wiring up of various types of guards in Angular. You can read more about the updates in [this blog post (Advancements in the Angular Router)](https://blog.angular.io/advancements-in-the-angular-router-5d69ec4c032).
Our implementation would then simply call the components `canDeactivate` function
```tsx
import { CanDeactivateFn } from '@angular/router'
import { Observable } from 'rxjs'
import { DeactivatableComponent } from './deactivatable-component.interface.ts'
/** Our Route Guard as a Function */
export const canDeactivateFormComponent: CanDeactivateFn = (component: DeactivatableComponent) => {
if (component.canDeactivate) {
return component.canDeactivate()
}
return true
}
```
This function can then be passed directly to the routes as:
```tsx
const routes: Routes = [
{
path: 'favorites',
component: FavoritesForm,
canDeactivate: [canDeactivateFormComponent],
},
]
```
2. Implementing the route guard as an injectable class
Route guards can also be implemented as an injectable class. This implementation looks very similar to the functional guard. And so we have:
```tsx
import { CanDeactivate } from '@angular/router'
import { Observable } from 'rxjs'
import { Injectable } from '@angular/core'
/* Our Route Guard as an Injectable Class */
@Injectable({
providedIn: 'root',
})
export class UnsavedChangesGuard implements CanDeactivate {
canDeactivate: CanDeactivateFn = (component: DeactivatableComponent) => {
if (component.canDeactivate) {
return component.canDeactivate()
}
return true
}
}
export interface DeactivatableComponent {
canDeactivate: () => boolean | Observable
}
```
This can then also be added to the `canDeactivate` property for the route as:
```tsx
const routes: Routes = [
{
path: 'favorites',
component: FavoritesForm,
canDeactivate: [canDeactivateFormComponent],
}
]
```
With our guard in place, if we edit the form and try to navigate away without saving, we will be warned through a dialog
You can [preview an example of the app here](https://angular-zzjpgu.stackblitz.io):
### Links and Resources
* [`Route` properties (Angular Docs)](https://angular.io/api/router/Route#properties)
* [`CanDeactivateFn` signature](https://angular.io/api/router/CanDeactivateFn)
* [`CanDeactivate` interface](https://angular.io/api/router/CanDeactivate)
* [Advancements in the Angular Router](https://blog.angular.io/advancements-in-the-angular-router-5d69ec4c032) (Angular Blog)
#### Here's my track of the Week
## Improving Your Git Workflows with Aliases

There are plenty of times when I have found myself looking up git commands that I would like to execute in my day to day whether on my day job or side project work. As such, git provides the ability to configure aliases — short commands that represent longer commands that git executes.
### Configuring Git Aliases
A git alias can be set up by running the command `git config --global alias. `. Where `` represents the command that triggers the ``. A simple example would be setting up a git alias, `git ac` that will take a commit message, stages all files and commit them all in one go. Setting up this command would look like:
```txt
git config --global alias.ac "\!git add -A && git commit -S -m"
```
This command then updates the global `.gitconfig` file, by adding an entry under `[alias]` called `ac` that enables this command to be executed in any git repository:
```txt
[alias]
ac = !git add -A && git commit -S -m
```
After editing some files in a git repository, running `git ac "docs: update notes"` stages all changed files in that repository and commits them using the commit message `"docs: update notes"`.
### A list of Useful Git Aliases
Herein, therefore, is a list of git aliases that drive my daily work.
I’ll group the commands into (a) Commands within a git repository and (b) commands within a **bare** git repository
#### Within a normal git repository
:::tip
These Commands can also be performed within a worktree in a bare git repository
:::
1. `ac` - Pass in a commit message to the git alias. The command stage all files (`git add -A`) and commits with the commit message passed in.
```txt
ac = !git add -A && git commit -S -m
```
2. `add-string` - Among all the changed files in a git repository, Stage only the files where the diff contains a certain substring. Fos instance, if one would want to stage only files that contain the substring `randomFilterFunction`, then, executing the command `git add-string "randomFilterFunction"` would only stage that files where the diff contains the substring `“randomFilterFunction”`.
```txt
add-string = "!sh -c \"git diff -G '$1' --name-only | xargs git add\" -"
```
3. `last-checked` - Within a git repository, find the last `n` checked out branches.
```txt
last-checked = !git reflog | grep -i 'checkout: moving' | head -n
```
This is useful when trying to find out the last few branches that were worked on, especially when switching between branches. For instance, running `git last-checked 5` would return output similar to:
```txt
ae956a5 HEAD@{4}: checkout: moving from main to chore/update-new-env-gh
ae956a5 HEAD@{5}: checkout: moving from chore/update-node-ci to main
ae956a5 HEAD@{7}: checkout: moving from main to chore/update-node-ci
aafa50f HEAD@{9}: checkout: moving from docs/update to main
fba6d0a HEAD@{11}: checkout: moving from fix/github-actions-permissions to docs/update
```
4. `parent` - For a given branch, find the branch from which the current branch was created from. [Source for this git alias command on StackOverflow.](https://stackoverflow.com/questions/3161204/how-to-find-the-nearest-parent-of-a-git-branch)
```txt
parent = "!git show-branch | grep '*' | grep -v \"$(git rev-parse --abbrev-ref HEAD)\" | head -n1 | sed 's/.*\\[\\(.*\\)\\].*/\\1/' | sed 's/[\\^~].*//' #"
```
5. `push-origin` - Sets up the upstream and pushes the local branch to the remote origin. If a branch is created locally, one would have to publish the branch and push to it. This command provides an easy interface for that process from the command line.
```txt
push-origin = !git push --set-upstream origin \"$(git rev-parse --abbrev-ref HEAD)\"
```
6. `uncommit` - This resets the last commit made within a git repository.
```txt
uncommit = reset --soft HEAD~1
```
7. `cb` - An alias for the command: `git checkout -b {branch_name}` - Checks out a new branch
```txt
cb = checkout -b
```
8. `adc` - Stages and commits all the edited files in a git repo
```txt
adc = !git add -A && git commit -S -m
```
#### Working with a bare git repository
:::tip
Working within a git repository provides much needed functionality. However, bare repositories with git worktrees. provide an opportunity to switch in between different pieces of work seamlessly, without having to clone the repository over and over again.
:::
1. `clone-bare` - Pass in a git url and clone into a bare repository.
```txt
clone-bare = !git clone --bare
```
2. `wa` -”worktree add” - Within a bare repository, this git alias takes two commands, the first being the new branch name, the second being the base branch. The new worktree will be located at the path that matches the branch name and based on the base branch.
Note: The Command `git rev-parse --git-common-dir` ensures that worktree paths are always generated from the root of the bare repo
```txt
wa = "!sh -c \"cd $(git rev-parse --git-common-dir) && git worktree add --no-track -b '$1' '$1' '$2'\" -"
```
3. `fetch-some` - Inside a bare repository, fetch and update the local branches of the comma-delimited list of branches. This is useful if one would want to update the local branches with their remote updates.
```txt
fetch-some = "!f() { IFS=','; for b in $1; do git fetch origin $b:$b; done; unset IFS; }; f"
```
4. `fetch-all` - For all the worktrees in a bare repository, update with their remotes. This is the equivalent of going into each of the worktrees and running `git pull`
```txt
fetch-all = "!git for-each-ref --format='%(refname:short)' refs/heads/ | while read branch; do git fetch origin $branch:$branch; done"
```
#### The Complete List
All the git aliases mentioned above can be directly added to the `~/.gitconfig` file via a code editor.
```txt
# The .gitconfig file
[alias]
# Pass in a commit Message, This will stage ALL the changed files and commit with the provided commit message
ac = !git add -A && git commit -S -m
# Filter changed files based on a string and ONLY stage files that contain that substring in the diff
add-string = "!sh -c \"git diff -G '$1' --name-only | xargs git add\" -"
c = !git commit -S -m
# This clones a git repository into bare repository
clone-bare = !git clone --bare
# For each the comma-delimited x of provided input a,b,c,...,n run git fetch origin x:x
fetch-some = "!f() { IFS=','; for b in $1; do git fetch origin $b:$b; done; unset IFS; }; f"
# For each branch y in a git bare repo, run git fetch origin y:y
fetch-all = "!git for-each-ref --format='%(refname:short)' refs/heads/ | while read branch; do git fetch origin $branch:$branch; done
# List the last n checked out branches in a git repository
last-checked = !git reflog | grep -i 'checkout: moving' | head -n
# lists the "parent" branch for a given branch
# Source: https://stackoverflow.com/questions/3161204/how-to-find-the-nearest-parent-of-a-git-branch
parent = "!git show-branch | grep '*' | grep -v \"$(git rev-parse --abbrev-ref HEAD)\" | head -n1 | sed 's/.*\\[\\(.*\\)\\].*/\\1/' | sed 's/[\\^~].*//' #"
# Sets up the upstream and pushes the local branch to the remote origin
push-origin = !git push --set-upstream origin \"$(git rev-parse --abbrev-ref HEAD)\"
# This resets the last commit made
uncommit = reset --soft HEAD~1
# This git alias takes two commands, the first being the new branch name, the second being the base branch
# The new worktree will be located at the path that matches the branch name and based on the base branch
# Git Worktree Documentation: https://git-scm.com/docs/git-worktree
# The Command `git rev-parse --git-common-dir ensures that worktree paths are always generated from the root of the bare repo
wa = "!sh -c \"cd $(git rev-parse --git-common-dir) && git worktree add --no-track -b '$1' '$1' '$2'\" -"
# Adds all the files in the current directory and commits with the provided commit message
adc = !git add -A && git commit -S -m
# checkout a new branch
cb = checkout -b
```
### References
* [Git Documentation on Git Aliases](https://www.git-scm.com/book/en/v2/Git-Basics-Git-Aliases#_git_aliases)
* [Atlassian Guide on Git Alias](https://www.atlassian.com/git/tutorials/git-alias)
* [Git Worktree Documentation](https://git-scm.com/docs/git-worktree)
* [A reference to my own `.gitconfig` file](https://github.com/laudebugs/uses/blob/master/dotfiles/.gitconfig)
## TypeScript Type Utilities and Functions

Here are some utility types and functions that I have found useful that are not enough to qualify publishing them into a library but I end up copy-pasting for use in between projects.
### Custom Utility Types
1. `FilteredType` - A Type that filters down the `TypeToFilter` to a tuple of types that match the `Condition`
```ts twoslash
type FilteredType = {
[K in keyof TypeToFilter]: TypeToFilter[K] extends Condition ? K : never
}[keyof TypeToFilter]
```
2. `Constructable`- a type that matches a type that can be instantiated, i.e. classes
```ts twoslash
type Constructable = new (...args: any[]) => T
```
3. `ValueOf` - For a given type, this filters down to a tuple of the values of the type
```ts twoslash
type ValueOf = T[keyof T]
```
4. `DeepPartial` - Makes all nested properties of an object to be Optional.
```ts twoslash
type DeepPartial = T extends Object ? {
[K in keyof T] : DeepPartial
} : T
```
### Utility Functions
1. The `filterKeys` type filters a type based on the regex provided. This is useful if you would like to get the keys of an object that meet a certain criteria.
```ts twoslash
type FilteredType = {
[K in keyof TypeToFilter]: TypeToFilter[K] extends Condition ? K : never
}[keyof TypeToFilter]
// ---cut---
function filterKeys(source: T, regExp: K): FilteredType[]{
return Object.keys(source).filter((key) =>
regExp.test(key)
) as FilteredType[]
}
```
2. `getConstructorParams` - this returns a list of the constructor parameters of the class. We can also utilize the `Constructable` type we defined earlier and pass the class into the function:
```ts twoslash
/* as defined above in the utility types */
type Constructable = new (...args: any[]) => T
function getConstructorParams(constructor: Constructable) {
const params = constructor.toString().match(/\(([^)]*)\)/)?.[1]
return params?.split(',').map((param) => param.trim()) ?? []
}
```
## Customizing Angular Material with your own palette

[Angular Material](https://material.angular.io/guide/theming) provides flexibility in making your website look and feel like the brand you are trying to build.
One of these the ways the library achieves this is by adding your own palette instead of [the default themes](https://material.angular.io/guide/theming#using-a-pre-built-theme): `deep-purple-amber`, `indigo-pink`, `purple-green` or `pink-bluegrey`.
The first thing you'd need to do is select your primary, accent and tertiary colors. [The material.io Color Tool](https://material.io/resources/color/#!/) provides a useful visual preview of what your primary and accent colors would look like on an application interface.
Here's a sample which you [can also preview here:](https://material.io/resources/color/#!/?primary.color=673AB7\&secondary.color=9C27B0\&view.left=0\&view.right=0)
 The tool also shows you how accessible your color palette is against fonts of various colors. [With the above palette](https://material.io/resources/color/#!/?primary.color=673AB7\&secondary.color=9b27af\&view.left=1\&view.right=0), for instance, the `P-Dark` with black text would not be as visible.
Although this tool doesn't provide an option to add a `warn` color, the angular material [documentation makes this palette optional](https://material.angular.io/guide/theming#defining-a-theme) and defaults to `red` if not specified.
With the palette above: (primary: `#673ab7`, secondary: `#9b27af`, and a warn color value of `#f4511e`), we can use an open source tool called [Material Design Palette generator](https://github.com/mbitson/mcg) to generate hues of 50 and then each 100 between 100 and 900 without having to do this manually.
Our resulting palette would look like below. You could also [play around with the palette here](http://mcg.mbitson.com/#!?primary=%23673ab7\&accent=%239b27af\&warn=%23f4511e\&themename=material-palette) and try out different colors as well.
The tool also shows you how accessible your color palette is against fonts of various colors. [With the above palette](https://material.io/resources/color/#!/?primary.color=673AB7\&secondary.color=9b27af\&view.left=1\&view.right=0), for instance, the `P-Dark` with black text would not be as visible.
Although this tool doesn't provide an option to add a `warn` color, the angular material [documentation makes this palette optional](https://material.angular.io/guide/theming#defining-a-theme) and defaults to `red` if not specified.
With the palette above: (primary: `#673ab7`, secondary: `#9b27af`, and a warn color value of `#f4511e`), we can use an open source tool called [Material Design Palette generator](https://github.com/mbitson/mcg) to generate hues of 50 and then each 100 between 100 and 900 without having to do this manually.
Our resulting palette would look like below. You could also [play around with the palette here](http://mcg.mbitson.com/#!?primary=%23673ab7\&accent=%239b27af\&warn=%23f4511e\&themename=material-palette) and try out different colors as well.
 The cool thing about the tool above is that it provides an easy export function for various frameworks including Android, Angular, React, Vue, Ember and more.
Since we are using Angular, we would use the Angular 2 Material exported values which we can define in a `palette.scss` file:
```scss
/* For use in src/lib/core/theming/_palette.scss */
$primary: (
50: #ede7f6,
100: #d1c4e9,
200: #b39ddb,
300: #9575cd,
400: #7e58c2,
500: #673ab7,
600: #5f34b0,
700: #542ca7,
800: #4a259f,
900: #391890,
A100: #d4c7ff,
A200: #ad94ff,
A400: #8661ff,
A700: #7347ff,
contrast: (
50: #000000,
100: #000000,
200: #000000,
300: #000000,
400: #ffffff,
500: #ffffff,
600: #ffffff,
700: #ffffff,
800: #ffffff,
900: #ffffff,
A100: #000000,
A200: #000000,
A400: #ffffff,
A700: #ffffff,
),
);
$accent: (
50: #f3e5f5,
100: #e1bee7,
200: #cd93d7,
300: #b968c7,
400: #aa47bb,
500: #9b27af,
600: #9323a8,
700: #891d9f,
800: #7f1796,
900: #6d0e86,
A100: #efb7ff,
A200: #e384ff,
A400: #d851ff,
A700: #d237ff,
contrast: (
50: #000000,
100: #000000,
200: #000000,
300: #000000,
400: #ffffff,
500: #ffffff,
600: #ffffff,
700: #ffffff,
800: #ffffff,
900: #ffffff,
A100: #000000,
A200: #000000,
A400: #000000,
A700: #ffffff,
),
);
$warn: (
50: #feeae4,
100: #fccbbc,
200: #faa88f,
300: #f78562,
400: #f66b40,
500: #f4511e,
600: #f34a1a,
700: #f14016,
800: #ef3712,
900: #ec270a,
A100: #ffffff,
A200: #ffe5e2,
A400: #ffb7af,
A700: #ffa096,
contrast: (
50: #000000,
100: #000000,
200: #000000,
300: #000000,
400: #000000,
500: #ffffff,
600: #ffffff,
700: #ffffff,
800: #ffffff,
900: #ffffff,
A100: #000000,
A200: #000000,
A400: #000000,
A700: #000000,
),
);
```
In our `theme.scss` file, we would then define our palette as below:
```scss
@use './palette.scss' as palette;
@use '@angular/material' as mat;
@import '@angular/material/theming';
$app-primary: mat.define-palette(palette.$primary);
$app-accent: mat.define-palette(palette.$accent);
$app-warn: mat.define-palette(palette.$warn);
$app-theme: mat.define-light-theme(
(
color: (
primary: $app-primary,
accent: $app-accent,
warn: $app-warn,
),
)
);
@include mat.all-component-themes($app-theme);
```
And just like that, we have customized our Angular App using Angular Material and a custom theme.
### Links and Resources
* [Angular Material](https://material.angular.io/)
* [Material Design Color Tool](https://material.io/resources/color/#!)
* [Material Design Palette Generator](https://github.com/mbitson/mcg)
import { StackBlitzEmbed } from '../../../components/StackBlitzEmbed'
## Dynamic Components in Angular

Angular components can be created(instantiated) at different points of the applications cycle wither at build-time or at run-time. Creating components at run-time (dynamically) is what we are going to look at.
Broadly speaking, there are two ways to create dynamic components in Angular:
1. Using a `ViewContainerRef` - that [“represents a container where one or more views can be attached to a component.”](https://angular.io/api/core/ViewContainerRef#viewcontainerref) or
2. By using Angular's built in [`NgComponentOutlet` directive](https://angular.io/api/common/NgComponentOutlet)
The main focus of this article will be the former, using a `ViewContainerRef` to create dynamic components since the Angular documentation is really clear on the second way - using `NgComponentOutlet`.
### Using `ViewContainerRef`
The `ViewContainerRef` is a class that gets access to a container where other components (host views) can be inserted at run time using the `createComponent()` method of the `ViewContainerRef` class.
To dynamically create a component, we have to decide how and where we would like to place the component (the “anchor point”).
#### Step 1. Defining the anchor point
How you define the anchor point determines where you can place it within a host component.
##### (i) The Anchor Directive
Following the [Angular docs example](https://angular.io/guide/dynamic-component-loader#the-anchor-directive) on creating a dynamic component, one can utilize a directive placed on an element such that the element will act as an insertion point to the dynamic component (a host - i.e. “Create the dynamic component and place me wherever you see this directive” on an element.)
To achieve this, we first create the directive and inject the `ViewContainerRef` . The `ViewContainerRef` will get a reference to the element on which the directive is placed, dynamically create the component and insert it into the view at the position where the element is.
Take the scenario where we would like to display [a list of movies](https://github.com/laudebugs/dynamic-components-angular/wiki/Movie-Data) with their information (a simple example that can be achieved with other ways but easy enough to demonstrate with dynamic components).
A movie has the following interface:
```ts twoslash
export interface IMovie {
id: number
title: string
poster: string
synopsis: string
genres: Array
year: number
director: string
actors: Array
hours: Array
}
```
We can then define our `MovieHostDirective` as follows:
```ts twoslash
import { Directive, ViewContainerRef } from '@angular/core'
@Directive({
selector: '[movieHost]',
})
export class MovieHostDirective {
constructor(public viewContainerRef: ViewContainerRef) {}
}
```
When we then create our host component template, we can place this directive on an element such as a `div` or using angular's `ng-template` or `ng-container`.
```html
```
:::tip
All of the above ways are valid ways of attaching an anchor directive. However, as the Angular docs point out, ["\[t\]he `ng-template` element is a good choice for dynamic components because it doesn't render any additional output."](https://angular.io/guide/dynamic-component-loader#loading-components)
:::
We can then get a reference to the element with the directive by querying the component template for the first occurrence of the directive (using `ViewChild` ), or all occurrences of the directive (using `ViewChildren`):
```ts
/* Using ViewChild to get the first occurrence */
@ViewChild(MovieHostDirective, { static: true }) movieHost: MovieHostDirective;
/* Using ViewChildren to get the all occurrences */
@ViewChildren(MovieHostDirective, { static: true }) movieHosts: QueryList;
```
:::tip
Note that `@ViewChildren` will return a `QueryList` - that contains a list of of `ViewContainerRef` types. To get elements inside of the `QueryList`, one can use the `QueryList`'s `.length` property together with the `.get` method to get an element at a particular index. For example, for a query list of length 1, we can get the first element by `movieHosts.get(0)`. In our example this will return a `ViewContainerRef` that contains a `MovieHostDirective` instance. Documentation on [`@ViewChildren` can be found here](https://angular.io/api/core/ViewChildren) .
:::
##### (ii) Using a Template Variable to target an element as an Anchor
One can target an element to act as a host for our dynamic component by using a template variable that follows the syntax `#` followed by whatever variable name we would like. For example, if our template variable name is to be called: `TemplateRefAnchor` then, in our html template, we would have:
```html
```
##### (iii) The Host View as the Anchor
We can use the host view (the component in which we will create the dynamic component) as an anchor for the newly created component. In this case, the created components would be appended at the end of the DOM tree. This works if we know that we don't have to insert the newly created elements before other elements that were generated at build time.
In this case, we inject the `ViewContainerRef` into the component:
#### Step 2: Creating the Dynamic Component
Taking the `@ViewChild` use case, (the same applies to the `@ViewChildren` case), the view queries are set before the `ngAfterViewInit` life cycle hook is called. We can then create our dynamic components at this point.
```ts
import { Component, AfterViewInit, ViewChild, } from '@angular/core';
/* We defined the MovieHostDirective earlier */
import { MovieHostDirective } from '../core/directives/movie-host.directive'
/* Assume we created this MovieComponent component somewhere else */
import { MovieComponent } from '../core/components/movie/movie.component'
@Component({
selector: 'app-home',
template: ``,
})
export class HomeComponent extends AfterViewInit {
/* Look up the element containing the MoviehostDirective */
@ViewChild(MovieHostDirective, { static: true, read: ViewContainerRef }) movieHost!: ViewContainerRef
/* Look Up the template reference called TemplateRefAnchor */
@ViewChild('TemplateRefAnchor', { static: true, read: ViewContainerRef }) templateRefAnchor!: ViewContainerRef
/* Another template reference to use createOptions */
@ViewChild('UsingCreateComponentOptionsAnchor', { static: true, read: ViewContainerRef }) createComponentOptionsAnchor!: ViewContainerRef
/* Create dynamic components here */
ngAfterViewInit(){
const component = this.movieHost.createComponent(MovieComponent)
component.instance.movie = MOVIES[0]
}
}
```
Similar example while using a template reference as an anchor:
```ts
// ... code ommited
@Component({
selector: 'app-home',
template: ``,
})
export class HomeComponent extends AfterViewInit {
/* Look Up the template reference called TemplateRefAnchor */
@ViewChild('TemplateRefAnchor', { static: true, read: ViewContainerRef }) templateRefAnchor!: ViewContainerRef
ngAfterViewInit(){
/* Create the dynamic component using the template reference as an anchor */
const component = this.templateRefAnchor.createComponent(MovieComponent)
component.instance.movie = MOVIES[0]
}
}
```
Similar example using the host element as the anchor:
```ts
// ... code ommited
@Component({
selector: 'app-home',
template: `
The cool thing about the tool above is that it provides an easy export function for various frameworks including Android, Angular, React, Vue, Ember and more.
Since we are using Angular, we would use the Angular 2 Material exported values which we can define in a `palette.scss` file:
```scss
/* For use in src/lib/core/theming/_palette.scss */
$primary: (
50: #ede7f6,
100: #d1c4e9,
200: #b39ddb,
300: #9575cd,
400: #7e58c2,
500: #673ab7,
600: #5f34b0,
700: #542ca7,
800: #4a259f,
900: #391890,
A100: #d4c7ff,
A200: #ad94ff,
A400: #8661ff,
A700: #7347ff,
contrast: (
50: #000000,
100: #000000,
200: #000000,
300: #000000,
400: #ffffff,
500: #ffffff,
600: #ffffff,
700: #ffffff,
800: #ffffff,
900: #ffffff,
A100: #000000,
A200: #000000,
A400: #ffffff,
A700: #ffffff,
),
);
$accent: (
50: #f3e5f5,
100: #e1bee7,
200: #cd93d7,
300: #b968c7,
400: #aa47bb,
500: #9b27af,
600: #9323a8,
700: #891d9f,
800: #7f1796,
900: #6d0e86,
A100: #efb7ff,
A200: #e384ff,
A400: #d851ff,
A700: #d237ff,
contrast: (
50: #000000,
100: #000000,
200: #000000,
300: #000000,
400: #ffffff,
500: #ffffff,
600: #ffffff,
700: #ffffff,
800: #ffffff,
900: #ffffff,
A100: #000000,
A200: #000000,
A400: #000000,
A700: #ffffff,
),
);
$warn: (
50: #feeae4,
100: #fccbbc,
200: #faa88f,
300: #f78562,
400: #f66b40,
500: #f4511e,
600: #f34a1a,
700: #f14016,
800: #ef3712,
900: #ec270a,
A100: #ffffff,
A200: #ffe5e2,
A400: #ffb7af,
A700: #ffa096,
contrast: (
50: #000000,
100: #000000,
200: #000000,
300: #000000,
400: #000000,
500: #ffffff,
600: #ffffff,
700: #ffffff,
800: #ffffff,
900: #ffffff,
A100: #000000,
A200: #000000,
A400: #000000,
A700: #000000,
),
);
```
In our `theme.scss` file, we would then define our palette as below:
```scss
@use './palette.scss' as palette;
@use '@angular/material' as mat;
@import '@angular/material/theming';
$app-primary: mat.define-palette(palette.$primary);
$app-accent: mat.define-palette(palette.$accent);
$app-warn: mat.define-palette(palette.$warn);
$app-theme: mat.define-light-theme(
(
color: (
primary: $app-primary,
accent: $app-accent,
warn: $app-warn,
),
)
);
@include mat.all-component-themes($app-theme);
```
And just like that, we have customized our Angular App using Angular Material and a custom theme.
### Links and Resources
* [Angular Material](https://material.angular.io/)
* [Material Design Color Tool](https://material.io/resources/color/#!)
* [Material Design Palette Generator](https://github.com/mbitson/mcg)
import { StackBlitzEmbed } from '../../../components/StackBlitzEmbed'
## Dynamic Components in Angular

Angular components can be created(instantiated) at different points of the applications cycle wither at build-time or at run-time. Creating components at run-time (dynamically) is what we are going to look at.
Broadly speaking, there are two ways to create dynamic components in Angular:
1. Using a `ViewContainerRef` - that [“represents a container where one or more views can be attached to a component.”](https://angular.io/api/core/ViewContainerRef#viewcontainerref) or
2. By using Angular's built in [`NgComponentOutlet` directive](https://angular.io/api/common/NgComponentOutlet)
The main focus of this article will be the former, using a `ViewContainerRef` to create dynamic components since the Angular documentation is really clear on the second way - using `NgComponentOutlet`.
### Using `ViewContainerRef`
The `ViewContainerRef` is a class that gets access to a container where other components (host views) can be inserted at run time using the `createComponent()` method of the `ViewContainerRef` class.
To dynamically create a component, we have to decide how and where we would like to place the component (the “anchor point”).
#### Step 1. Defining the anchor point
How you define the anchor point determines where you can place it within a host component.
##### (i) The Anchor Directive
Following the [Angular docs example](https://angular.io/guide/dynamic-component-loader#the-anchor-directive) on creating a dynamic component, one can utilize a directive placed on an element such that the element will act as an insertion point to the dynamic component (a host - i.e. “Create the dynamic component and place me wherever you see this directive” on an element.)
To achieve this, we first create the directive and inject the `ViewContainerRef` . The `ViewContainerRef` will get a reference to the element on which the directive is placed, dynamically create the component and insert it into the view at the position where the element is.
Take the scenario where we would like to display [a list of movies](https://github.com/laudebugs/dynamic-components-angular/wiki/Movie-Data) with their information (a simple example that can be achieved with other ways but easy enough to demonstrate with dynamic components).
A movie has the following interface:
```ts twoslash
export interface IMovie {
id: number
title: string
poster: string
synopsis: string
genres: Array
year: number
director: string
actors: Array
hours: Array
}
```
We can then define our `MovieHostDirective` as follows:
```ts twoslash
import { Directive, ViewContainerRef } from '@angular/core'
@Directive({
selector: '[movieHost]',
})
export class MovieHostDirective {
constructor(public viewContainerRef: ViewContainerRef) {}
}
```
When we then create our host component template, we can place this directive on an element such as a `div` or using angular's `ng-template` or `ng-container`.
```html
```
:::tip
All of the above ways are valid ways of attaching an anchor directive. However, as the Angular docs point out, ["\[t\]he `ng-template` element is a good choice for dynamic components because it doesn't render any additional output."](https://angular.io/guide/dynamic-component-loader#loading-components)
:::
We can then get a reference to the element with the directive by querying the component template for the first occurrence of the directive (using `ViewChild` ), or all occurrences of the directive (using `ViewChildren`):
```ts
/* Using ViewChild to get the first occurrence */
@ViewChild(MovieHostDirective, { static: true }) movieHost: MovieHostDirective;
/* Using ViewChildren to get the all occurrences */
@ViewChildren(MovieHostDirective, { static: true }) movieHosts: QueryList;
```
:::tip
Note that `@ViewChildren` will return a `QueryList` - that contains a list of of `ViewContainerRef` types. To get elements inside of the `QueryList`, one can use the `QueryList`'s `.length` property together with the `.get` method to get an element at a particular index. For example, for a query list of length 1, we can get the first element by `movieHosts.get(0)`. In our example this will return a `ViewContainerRef` that contains a `MovieHostDirective` instance. Documentation on [`@ViewChildren` can be found here](https://angular.io/api/core/ViewChildren) .
:::
##### (ii) Using a Template Variable to target an element as an Anchor
One can target an element to act as a host for our dynamic component by using a template variable that follows the syntax `#` followed by whatever variable name we would like. For example, if our template variable name is to be called: `TemplateRefAnchor` then, in our html template, we would have:
```html
```
##### (iii) The Host View as the Anchor
We can use the host view (the component in which we will create the dynamic component) as an anchor for the newly created component. In this case, the created components would be appended at the end of the DOM tree. This works if we know that we don't have to insert the newly created elements before other elements that were generated at build time.
In this case, we inject the `ViewContainerRef` into the component:
#### Step 2: Creating the Dynamic Component
Taking the `@ViewChild` use case, (the same applies to the `@ViewChildren` case), the view queries are set before the `ngAfterViewInit` life cycle hook is called. We can then create our dynamic components at this point.
```ts
import { Component, AfterViewInit, ViewChild, } from '@angular/core';
/* We defined the MovieHostDirective earlier */
import { MovieHostDirective } from '../core/directives/movie-host.directive'
/* Assume we created this MovieComponent component somewhere else */
import { MovieComponent } from '../core/components/movie/movie.component'
@Component({
selector: 'app-home',
template: ``,
})
export class HomeComponent extends AfterViewInit {
/* Look up the element containing the MoviehostDirective */
@ViewChild(MovieHostDirective, { static: true, read: ViewContainerRef }) movieHost!: ViewContainerRef
/* Look Up the template reference called TemplateRefAnchor */
@ViewChild('TemplateRefAnchor', { static: true, read: ViewContainerRef }) templateRefAnchor!: ViewContainerRef
/* Another template reference to use createOptions */
@ViewChild('UsingCreateComponentOptionsAnchor', { static: true, read: ViewContainerRef }) createComponentOptionsAnchor!: ViewContainerRef
/* Create dynamic components here */
ngAfterViewInit(){
const component = this.movieHost.createComponent(MovieComponent)
component.instance.movie = MOVIES[0]
}
}
```
Similar example while using a template reference as an anchor:
```ts
// ... code ommited
@Component({
selector: 'app-home',
template: ``,
})
export class HomeComponent extends AfterViewInit {
/* Look Up the template reference called TemplateRefAnchor */
@ViewChild('TemplateRefAnchor', { static: true, read: ViewContainerRef }) templateRefAnchor!: ViewContainerRef
ngAfterViewInit(){
/* Create the dynamic component using the template reference as an anchor */
const component = this.templateRefAnchor.createComponent(MovieComponent)
component.instance.movie = MOVIES[0]
}
}
```
Similar example using the host element as the anchor:
```ts
// ... code ommited
@Component({
selector: 'app-home',
template: ` Host element
`,
})
export class HomeComponent extends AfterViewInit {
constructor(private viewContainerRef: ViewContainerRef) { }
ngAfterViewInit(){
const component = this.viewContainerRef.createComponent(MovieComponent)
component.instance.movie = MOVIES[0]
}
}
```
:::tip
Notice that we are directly modifying the data of the dynamically created component.😱
This works, but it becomes problematic when you want to be strict about immutability or uni-directional data flow, and with `QueryLists`, we can't use this approach since the elements in the `QueryList` are immutable.
:::
We also see another issue with this approach. Since we mutate the data of the dynamic component, Angular's change detection will throw the `ExpressionChangedAfterItHasBeenCheckedError` warning that you may have encountered before:

The reason for this particular case is that angular has detected that we have changed the variable after it was last checked when the dynamically created component's view was initialized.
Some ways to resolve this is to move our code into the `ngAfterContentInit` life cycle hook or injecting the change detector (`ChangeDetectorRef`) and calling its `detectChanges()` method:
1. `ngAfterContentInit`
```ts
// code ommitted
export class HomeComponent implements AfterContentInit {
/* Implement the AfterContentInit life cycle hook */
ngAfterContentInit() {
/* Create the component */
const movieComponent = this.viewContainerRef.createComponent(MovieComponent)
/* Pass data to the dynamically created component here. */
movieComponent.instance.movie = MOVIES[0]
}
}
```
2. using the `ChangeDetectorRef`
```ts
// code ommitted
export class HomeComponent implements AfterViewInit {
/* Inject the ChangeDetectorRef */
constructor(private cd: ChangeDetectorRef, private viewContainerRef: ViewContainerRef) {}
ngAfterViewInit() {
/* Create the component */
const movieComponent = this.viewContainerRef.createComponent(MovieComponent)
/* Pass data to the dynamically created component here. */
movieComponent.instance.movie = MOVIES[0]
/* Tell angular to check for changes */
this.cd.detectChanges()
}
}
```
The `ViewContainerRef` also provides a way to inject dependencies into our dynamically created component in the options object ([the optional second parameter of the `createComponent` method](https://angular.io/api/core/ViewContainerRef#createcomponent)). The options object contains the following extra parameters (quoted from the Angular docs):
* `index` - the index at which to insert the new components host view
* `injector` - the injector to use as the parent for the new component
* `ngModuleRef` - an ngModuleRef of the component's `NgModule`
* `projectableNodes` - list of Dom nodes that should be projected though `ng-content`
Things begin to get a little more interesting as we explore this options object and how it expands our flexibility with dynamically created components. We'll explore the first two for now (`index` and `injector`).
##### `index`
The `index` parameter allows us to insert a dynamically created component at a particular index. Say we would like to create a second component dynamically and place it at index `0`, then we would do something like:
```ts
const movieComponent2 = viewContainerRef.createComponent(MovieComponent, { index: 0 })
```
Of course, we can't place an element at index `1` if the length of dynamically created components in the `ViewContainerRef` is `0`.
##### `injector`
We can inject dependencies into our dynamic components using the `injector` parameter.
Say, for instance, we want to pass in the movie when we create the component. We can first create an injector token that we can pass in for the movie dependency:
```ts
import { InjectionToken } from '@angular/core'
export const MOVIE_TOKEN = new InjectionToken('movie')
```
In our `movie.component.ts` file, we can then pass this dependency as a required dependency, or mark it as an optional dependency in the constructor - if you want to:
```ts
// In movie.component.ts
constructor(@Inject(MOVIE_TOKEN) public movie: IMovie) {}
// As an optional dependency
constructor(@Inject(MOVIE_TOKEN) @Optional() public movie: IMovie) {}
```
In our app.component.ts, we would then create an injector and pass it to our component when we create it. Firstly, we provide our token and pass in the value that we would like to be available to the dynamically created component.
```ts
// ... code ommitted
export class HomeComponent extends AfterViewInit {
constructor(public parentInjector: Injector) {}
// code ommited
ngAfterViewInit() {
/* Create the injector to be passed to the component and provide the value */
const injector = Injector.create({
providers: [{ provide: MOVIE_TOKEN, useValue: MOVIES[0] }],
parent: this.parentInjector,
})
/* Create the component with the injector passed in */
const movieComponent = viewContainerRef.createComponent(MovieComponent, {
index: 0,
injector,
})
}
}
```
:::tip
It's interesting to point out that marking the dependency as optional (using the `@Optional()` decorator) means that we can leave it out when creating the dynamic component. Otherwise, we would run into a null injector error when we call `createComponent` (`R3InjectorError`):

:::
#### Noteworthy
In previous versions of Angular, Dynamically created components had to be added to the `entryComponents` of the `NgModule` in which they are to be imported. With Ivy, this is no longer a requirement and they can be imported the same way as other components. [You can read more about it here.](https://angular.io/guide/deprecations#entrycomponents-and-analyze_for_entry_components-no-longer-required)
#### Recap
However you decide to choose where to anchor your components, all these ways are valid and can go far in and of themselves. One advantage of dynamically generating the component using the `ViewContainerRef` is that you have access to the current state of the newly created component and can leverage it for your particular use case.
### `NgComponentOutlet`
The `NgComponentOutlet` directive provides a “declarative approach for dynamic component creation” ([quoted from the Angular docs](https://angular.io/api/common/NgComponentOutlet#ngcomponentoutlet)). Here, the documentation is pretty clear on how to use this directive to dynamically create a component.
:::tip
The example code can be found in the [stackblitz here.](https://stackblitz.com/edit/dynamic-components-angular-demo)
:::
#### Resources and Links
* [Dynamic component loader](https://angular.io/guide/dynamic-component-loader)
* [ViewContainerRef](https://angular.io/api/core/ViewContainerRef)
* [NgComponentOutlet](https://angular.io/api/common/NgComponentOutlet#ngcomponentoutlet)
* [QueryList](https://angular.io/api/core/QueryList)
* [Stackblitz example on Dynamic Components](https://stackblitz.com/edit/dynamic-components-angular-demo)
* [GitHub repository to run locally](https://github.com/laudebugs/dynamic-components-angular/wiki/Movie-Data)
## Implementation of GraphQL subscriptions on React Native using Apollo Client with a Lambda GrahphQL Server

GraphQL queries and mutations to an AWS Lambda GraphQL api can be achieved by implementing libraries such as [Apollo Client](https://www.apollographql.com/docs/react/get-started/).
However, implementing subscriptions isn't as straight forward since the [AWS Lambda is a serverless architecture.](https://stackoverflow.com/questions/53734213/apollo-server-lambda-subscriptions#:~\:text=GraphQL%20subscriptions%20are%20not%20supported,which%20kills%20the%20websocket%20connection.)
Implementing subscriptions can be done [following the AWS implementation docs](https://docs.aws.amazon.com/appsync/latest/devguide/real-time-websocket-client.html#appsynclong-real-time-websocket-client-implementation-guide-for-graphql-subscriptions) - although we don't want to go into that rabbit hole as well as the option of using [AWS' Amplify JavaScript Libraries](https://docs.amplify.aws/lib/q/platform/js/).
> In our case, we would like to take advantage of [Apollo Client's](https://www.apollographql.com/docs/react/why-apollo/) apis that offer useful features within a react application such as hooks, caching, and also since it's simpler (one can argue). 💁
### Setup
To get started, working with queries and mutations can be achieved by following [Apollo's documentation.](https://www.apollographql.com/docs/react/get-started/). Where it get's interesting is once a subscription is needed to be made by the client.
First, we need to configure our Apollo client to [make use of the Apollo links to connect to the AppSync api](https://github.com/awslabs/aws-mobile-appsync-sdk-js#aws-appsync-links-for-apollo-v3). These are: `aws-appsync-auth-link` and `aws-appsync-subscription-link`. The former provides authentication for the Apollo client to connect to the api while the later provides the subscription tooling that AWS Lambdas need to work with subscriptions, which [we would have otherwise needed to implement ourselves](https://docs.aws.amazon.com/appsync/latest/devguide/real-time-websocket-client.html#appsynclong-real-time-websocket-client-implementation-guide-for-graphql-subscriptions).🤢
The example provided in [the docs here](https://github.com/awslabs/aws-mobile-appsync-sdk-js#using-authorization-and-subscription-links-with-apollo-client-v3-no-offline-support) is pretty straightforward.
In our case, the `auth` provided to the Apollo links would look like:
```ts
const auth = {
type: 'OPENID_CONNECT'
jwtToken: async () => token, // Required when you use Cognito UserPools OR OpenID Connect. token object is obtained previously
};
```
Although, the only thing to note is that, since we need to provide a token to the client, we just pass in our token that retrieves the most current Open ID JWT to pass to our requests.
Thus:
```ts
const link = ApolloLink.from([
createAuthLink({
url: API_URL,
region: AWS_REGION,
auth: { type: 'OPENID_CONNECT', jwtToken: async () => await getToken() },
}),
createSubscriptionHandshakeLink(
{ url: API_URL, region: AWS_REGION, auth: { type: 'OPENID_CONNECT', jwtToken: async () => await getToken() } },
httpLink,
),
])
```
This workaround was noted [in this issue on Github.](https://github.com/aws-amplify/amplify-js/issues/992)
### Issues
* ##### Unable to resolve module `buffer`:
 This can be solved by installing `buffer` and adding it to to the `App.tsx` file as noted in [here on Stack overflow](https://stackoverflow.com/questions/55226768/error-unable-to-resolve-module-buffer-react-native).
```ts
import { Buffer } from 'buffer';
global.Buffer = Buffer;
```
### Links
* [AppSync subscriptions with ApolloClient in React](https://stackoverflow.com/questions/62502579/appsync-subscriptions-with-apolloclient-in-react)
* [Using Authorization and Subscription links with Apollo Client V3 (No offline support)](https://github.com/awslabs/aws-mobile-appsync-sdk-js#using-authorization-and-subscription-links-with-apollo-client-v3-no-offline-support)
* [Building a real-time WebSocket client](https://docs.aws.amazon.com/appsync/latest/devguide/real-time-websocket-client.html#appsynclong-real-time-websocket-client-implementation-guide-for-graphql-subscriptions)
## NX Tips: Managing TsConfig Compiler Options Paths when building multiple angular libraries

Working with NX allows one to develop publishable or local shared libraries for all the applications and libraries in the monorepo itself.
One issue that one may encounter is when trying to build libraries that depend on other libraries within the same monorepo. Say for instance we are working in an nx workspace called `@boomerang` and within this workspace we have two angular [buildable libraries](https://nx.dev/more-concepts/buildable-and-publishable-libraries#buildable-libraries) called `@boomerang/common` and `@boomerang/utils`. Since these are Angular libraries, NX uses it's own wrapper around `ng-packagr` called [`@nrwl/ng-packagr-lite`](https://nx.dev/packages/angular/executors/ng-packagr-lite).
:::tip
Note: When creating a new Angular library with `nx generate @nrwl/angular:library`, if the library is both buildable and publishable, i.e. you pass in the `--buildable` and `--publishable` flags, then nx uses [`@nrwl/angular:library`](https://nx.dev/packages/angular/executors/package) to build the library.
:::
If, say `@boomerang/common` imports `@boomerang/utils`, when trying to build `@boomerang/common`, an error I encountered looked like `TS2307: Cannot find module '@boomerang/utils' or its corresponding type declarations.`
When I looked into what was causing the issue, its seems like a small tweak to the `tsConfig.base.json` at the root of the workspace by adding the `@boomerang/utils` dist path to the `compilerOptions` `paths` fixes the import issue.
```json
{
"compilerOptions": {
"paths: {
"@boomerang/common": ["libs/common/src/index.ts"],
"@boomerang/utils": ["libs/utils/src/index.ts"], // [!code --]
"@boomerang/utils": [ // [!code ++]
"dist/libs/utils", // [!code ++]
"libs/utils/src/index.ts" // [!code ++]
]
}
}
}
```
This solution was inspired by this [comment on nx github issues](https://github.com/nrwl/nx/issues/602#issuecomment-414051299) as well as this [commit diff solution](https://github.com/zack9433/poc-workspace/commit/7dfedf7fdaf852a64e3b55960ba0678438aedc64). Both of these mention updating the package.json as well to use the npm scope, i.e. updating the `package.json` for `@boomerang/utils` to look like:
```json
{
"name": "@boomerang/utils"
}
```
However, this update doesn’t necessarily fix the build issue if your packages are not publishable.
Happy Hacking!
#### Resources and Links
* [Publishable and Buildable Nx Libraries](https://nx.dev/more-concepts/buildable-and-publishable-libraries#publishable-and-buildable-nx-libraries)
* [`@nrwl/ng-packagr-lite` docs](https://nx.dev/packages/angular/executors/ng-packagr-lite#@nrwl/angular\:ng-packagr-lite)
* [`@nrwl/angular:library` docs](https://www.notion.so/NX-Tips-Managing-TsConfig-Compiler-Options-Paths-when-building-multiple-angular-libraries-69a68018574242bb80bf27ee1ed0e60c)
* [Github Comment with solution](https://github.com/nrwl/nx/issues/602#issuecomment-414051299)
* [poc-workspace diff by zack9433 on github to show a solution](https://github.com/zack9433/poc-workspace/commit/7dfedf7fdaf852a64e3b55960ba0678438aedc64)
import { CodeSandBox } from '../../../components/CodeSandBox'
## RxJs Pitfalls: Passing in a Observer's next function as a callback to pipe operators

When working with observable streams, often one uses `RxJs` operators to pipe into the stream (i.e. using [pipe-able operators](https://rxjs.dev/guide/operators)). Some of these operators take observers as an argument. An observer is an object that consumes values delivered by an observable and often implements one or more of the `next`, `error` and `complete` functions.
The RxJs `Subject` is a type of observable that is also an observer. A common pattern I find myself implementing in several projects is defining a `Subject`, often also a `BehaviorSubject` which then holds different pieces of data to be consumed in differnt parts of an application. In order to pass data to the `Subject`, which is also an observer, we call the `.next` with the data the Subject should hold. A simple example would be while using the [`tap` operator](https://rxjs.dev/api/index/function/tap) to perform side effects in our observable stream.
A common pitfall is then passing `Subject.next` directly as the argument to a pipeable operator. For instance, when using `tap`, calling `tap(new Subject().next)`.
We will see how this can cause unexpected errors that are may be hard to debug and how to avoid it.
***
Suppose you have an RxJs subject that is keeping track of the value in an observable stream (say called `stream$`).
```tsx twoslash
import { Subject, timer, take, tap } from 'rxjs'
const stream$ = timer(0, 1000).pipe(take(5))
```
One way to pass the current value to the subject is using the `tap` operator that accepts an observer, i.e. an object containing the `next`, `error` and `complete` functions.
If we only pass a callback function that logs out the current value in the observable stream, we would have something that looks like:
If we have a subject called `_count` where we would like to keep track of the current value in the stream, the first instinct would be to replace `console.log` with `_count.next`:
```ts twoslash
import { Subject, timer, take, tap } from 'rxjs'
const _count = new Subject()
const stream$ = timer(0, 1000).pipe(take(5))
stream$.pipe(
tap(_count.next)
).subscribe()
```
However, you'll notice that the above implementation **does not work**, resulting in the error: `TypeError: _this._throwIfClosed is not a function`.
The reason being that RxJs's `Subject` is a class whose `next` implementation relies on `this` keyword which refers to the `_count` instance. You can [view the source code here](https://github.com/ReactiveX/rxjs/blob/8.x/src/internal/Subject.ts#L60). Passing just the `_count.next` function would reference `this` which refers to the global scope and not the `_count` instance.
We can see this in action by implementing our own observer that references `this`:
```tsx
const observerStore = {
store: new Array(),
next(value: number) {
this.store.push(value)
},
}
/* Replacing the _count with our observer would then look like below👇🏻 */
stream$.pipe(
tap(observerStore.next)
).subscribe()
```
The implementation above would also give us an error: `TypeError: Cannot read properties of undefined (reading 'push')`. For the same reason that the `this` reference would refer to the `global` object and not the `observerStore` object.
:::tip
It's worth noting that if the observer's `next` implementation does not reference the `this` keyword, then passing in the `.next` function would work as expected.
:::
For instance, if our `observerStore`'s `next` function just logged out the value, then passing in the `observerStore.next` to `tap` would work as expected since the `next` function does not reference `this`:
```tsx
const observerStore = {
store: new Array(),
next(value: number) {
console.log(value)
},
}
/* Works! */
stream$.pipe(tap(_count.next)).subscribe()
```
#### Solutions
1. Pass in the observer object
The straightforward solution would be to simply to pass in the observer object into the `tap` operator:
```tsx
/* This works */
stream$.pipe(
tap(observerStore)
).subscribe()
```
2. Bind the observer to `this`
One could use [`Function.prototype.bind`](https://developer.mozilla.org/en-US/docs/Web/JavaScript/Reference/Global_objects/Function/bind) which is available to the function prototype to bind `this` to the observer object so that when `this` is referenced, the function references the observer instead of the global `this` object:
```tsx
/* _count Subjct */
stream$.pipe(
tap(_count.next.bind(_count))
).subscribe()
/* the observerStore */
stream$.pipe(
tap(observerStore.next.bind(observerStore))
).subscribe()
```
[As the MDN docs state](https://developer.mozilla.org/en-US/docs/Web/JavaScript/Reference/Global_objects/Function/bind), “The **`bind()`** method creates a new function that, when called, has its `this`keyword set to the provided value, with a given sequence of arguments preceding any provided when the new function is called.”
Although both of the solutions work, passing the observer object is much more clear to another reader of the code on what is going on whereas the latter would cause someone who didn't write the code to stop and ask why we are calling `.bind` in the first place.
Happy hacking!
#### References
* [MDN references on `Function.prototype.bind()`](https://developer.mozilla.org/en-US/docs/Web/JavaScript/Reference/Global_objects/Function/bind)
* [RxJs `tap` operator](https://rxjs.dev/api/operators/tap)
* [RxJs Operators](https://rxjs.dev/guide/operators)
## Writing a Custom RxJS Operator

While working with `rxjs`, there are plenty of operators that one can use within the `.pipe` operator of an observable. Just take a look at the api reference here and you'll realize that `rxjs` provides all the operators that you need for most cases.
However, what if you needed to write your custom operator to transform data the way you wanted, or tweak the `captureError` operator to handle the error in a certain way and return something else in case an error happened.
In an application I was working on, for which I was using [Sentry](https://docs.sentry.io/) to handle any errors, I wanted to have the `captureError` to send the error message to Sentry, and return fallback data in case an error happened.
```tsx
import { captureException } from '@sentry/angular'
import { BehaviorSubject, Observable, OperatorFunction, catchError, tap } from 'rxjs'
export function consume(consumer: BehaviorSubject, fallback$: Observable): OperatorFunction {
return (source$: Observable) => {
return source$.pipe(
catchError((error) => {
captureException(error)
return fallback$
}),
tap(consumer),
)
}
}
```
:::tip
Note that the `rxjs` tap operator takes either an observer object. In our case, our `consumer` is a `Behavior Subject` [which is also an observer](https://rxjs.dev/guide/subject).
:::
The operator above is written in the form of [a curried function](https://javascript.info/currying-partials), that accepts two initial inputs: `consumer` - which in this case was a behavior subject that stores the current value in the observable stream, and `fallback$` which is the data to return in case an error happens. If no error happens, the `captureError` rxjs operator isn't called. In all cases, either the data from the observable stream or the fallback data is passed on to the consuming [behavior Subject.](https://rxjs.dev/api/index/class/BehaviorSubject)
And there we have it! Our own custom RxJS operator 🧞♂️
### Links
* [RxJs documentation](https://rxjs.dev/)
* [RxJs Subject reference](https://rxjs.dev/api/index/class/Subject)
* [catch / catchError in RxJs](https://www.learnrxjs.io/learn-rxjs/operators/error_handling/catch)
* [Sentry JavaScript library documentation](https://docs.sentry.io/platforms/javascript/)
* [Currying in JavaScript](https://javascript.info/currying-partials)
## How To: Build an Express GraphQL API in TypeScript

:::tip
So you wanna write a node GraphQL backend in TypeScript? Well, Let's put all the pieces together and begin.
:::
### Initilizing the project
We'll be working in a terminal - be it the standalone teminal - or the integrated terminal in your text editor.
1. Initialize a repository in an empty folder, say, we call ours `express-gql-api`.:
```bash
mkdir express-gql-api
# enter the project folder
cd express-gql-api
```
2. Initialize the folder as a node and git project:
```bash
npm init -y
git init
```
3. Initialize a Readme
Having a Readme is essential for any project - this is the document people will see when they come across your repository in Github.
This can be solved by installing `buffer` and adding it to to the `App.tsx` file as noted in [here on Stack overflow](https://stackoverflow.com/questions/55226768/error-unable-to-resolve-module-buffer-react-native).
```ts
import { Buffer } from 'buffer';
global.Buffer = Buffer;
```
### Links
* [AppSync subscriptions with ApolloClient in React](https://stackoverflow.com/questions/62502579/appsync-subscriptions-with-apolloclient-in-react)
* [Using Authorization and Subscription links with Apollo Client V3 (No offline support)](https://github.com/awslabs/aws-mobile-appsync-sdk-js#using-authorization-and-subscription-links-with-apollo-client-v3-no-offline-support)
* [Building a real-time WebSocket client](https://docs.aws.amazon.com/appsync/latest/devguide/real-time-websocket-client.html#appsynclong-real-time-websocket-client-implementation-guide-for-graphql-subscriptions)
## NX Tips: Managing TsConfig Compiler Options Paths when building multiple angular libraries

Working with NX allows one to develop publishable or local shared libraries for all the applications and libraries in the monorepo itself.
One issue that one may encounter is when trying to build libraries that depend on other libraries within the same monorepo. Say for instance we are working in an nx workspace called `@boomerang` and within this workspace we have two angular [buildable libraries](https://nx.dev/more-concepts/buildable-and-publishable-libraries#buildable-libraries) called `@boomerang/common` and `@boomerang/utils`. Since these are Angular libraries, NX uses it's own wrapper around `ng-packagr` called [`@nrwl/ng-packagr-lite`](https://nx.dev/packages/angular/executors/ng-packagr-lite).
:::tip
Note: When creating a new Angular library with `nx generate @nrwl/angular:library`, if the library is both buildable and publishable, i.e. you pass in the `--buildable` and `--publishable` flags, then nx uses [`@nrwl/angular:library`](https://nx.dev/packages/angular/executors/package) to build the library.
:::
If, say `@boomerang/common` imports `@boomerang/utils`, when trying to build `@boomerang/common`, an error I encountered looked like `TS2307: Cannot find module '@boomerang/utils' or its corresponding type declarations.`
When I looked into what was causing the issue, its seems like a small tweak to the `tsConfig.base.json` at the root of the workspace by adding the `@boomerang/utils` dist path to the `compilerOptions` `paths` fixes the import issue.
```json
{
"compilerOptions": {
"paths: {
"@boomerang/common": ["libs/common/src/index.ts"],
"@boomerang/utils": ["libs/utils/src/index.ts"], // [!code --]
"@boomerang/utils": [ // [!code ++]
"dist/libs/utils", // [!code ++]
"libs/utils/src/index.ts" // [!code ++]
]
}
}
}
```
This solution was inspired by this [comment on nx github issues](https://github.com/nrwl/nx/issues/602#issuecomment-414051299) as well as this [commit diff solution](https://github.com/zack9433/poc-workspace/commit/7dfedf7fdaf852a64e3b55960ba0678438aedc64). Both of these mention updating the package.json as well to use the npm scope, i.e. updating the `package.json` for `@boomerang/utils` to look like:
```json
{
"name": "@boomerang/utils"
}
```
However, this update doesn’t necessarily fix the build issue if your packages are not publishable.
Happy Hacking!
#### Resources and Links
* [Publishable and Buildable Nx Libraries](https://nx.dev/more-concepts/buildable-and-publishable-libraries#publishable-and-buildable-nx-libraries)
* [`@nrwl/ng-packagr-lite` docs](https://nx.dev/packages/angular/executors/ng-packagr-lite#@nrwl/angular\:ng-packagr-lite)
* [`@nrwl/angular:library` docs](https://www.notion.so/NX-Tips-Managing-TsConfig-Compiler-Options-Paths-when-building-multiple-angular-libraries-69a68018574242bb80bf27ee1ed0e60c)
* [Github Comment with solution](https://github.com/nrwl/nx/issues/602#issuecomment-414051299)
* [poc-workspace diff by zack9433 on github to show a solution](https://github.com/zack9433/poc-workspace/commit/7dfedf7fdaf852a64e3b55960ba0678438aedc64)
import { CodeSandBox } from '../../../components/CodeSandBox'
## RxJs Pitfalls: Passing in a Observer's next function as a callback to pipe operators

When working with observable streams, often one uses `RxJs` operators to pipe into the stream (i.e. using [pipe-able operators](https://rxjs.dev/guide/operators)). Some of these operators take observers as an argument. An observer is an object that consumes values delivered by an observable and often implements one or more of the `next`, `error` and `complete` functions.
The RxJs `Subject` is a type of observable that is also an observer. A common pattern I find myself implementing in several projects is defining a `Subject`, often also a `BehaviorSubject` which then holds different pieces of data to be consumed in differnt parts of an application. In order to pass data to the `Subject`, which is also an observer, we call the `.next` with the data the Subject should hold. A simple example would be while using the [`tap` operator](https://rxjs.dev/api/index/function/tap) to perform side effects in our observable stream.
A common pitfall is then passing `Subject.next` directly as the argument to a pipeable operator. For instance, when using `tap`, calling `tap(new Subject().next)`.
We will see how this can cause unexpected errors that are may be hard to debug and how to avoid it.
***
Suppose you have an RxJs subject that is keeping track of the value in an observable stream (say called `stream$`).
```tsx twoslash
import { Subject, timer, take, tap } from 'rxjs'
const stream$ = timer(0, 1000).pipe(take(5))
```
One way to pass the current value to the subject is using the `tap` operator that accepts an observer, i.e. an object containing the `next`, `error` and `complete` functions.
If we only pass a callback function that logs out the current value in the observable stream, we would have something that looks like:
If we have a subject called `_count` where we would like to keep track of the current value in the stream, the first instinct would be to replace `console.log` with `_count.next`:
```ts twoslash
import { Subject, timer, take, tap } from 'rxjs'
const _count = new Subject()
const stream$ = timer(0, 1000).pipe(take(5))
stream$.pipe(
tap(_count.next)
).subscribe()
```
However, you'll notice that the above implementation **does not work**, resulting in the error: `TypeError: _this._throwIfClosed is not a function`.
The reason being that RxJs's `Subject` is a class whose `next` implementation relies on `this` keyword which refers to the `_count` instance. You can [view the source code here](https://github.com/ReactiveX/rxjs/blob/8.x/src/internal/Subject.ts#L60). Passing just the `_count.next` function would reference `this` which refers to the global scope and not the `_count` instance.
We can see this in action by implementing our own observer that references `this`:
```tsx
const observerStore = {
store: new Array(),
next(value: number) {
this.store.push(value)
},
}
/* Replacing the _count with our observer would then look like below👇🏻 */
stream$.pipe(
tap(observerStore.next)
).subscribe()
```
The implementation above would also give us an error: `TypeError: Cannot read properties of undefined (reading 'push')`. For the same reason that the `this` reference would refer to the `global` object and not the `observerStore` object.
:::tip
It's worth noting that if the observer's `next` implementation does not reference the `this` keyword, then passing in the `.next` function would work as expected.
:::
For instance, if our `observerStore`'s `next` function just logged out the value, then passing in the `observerStore.next` to `tap` would work as expected since the `next` function does not reference `this`:
```tsx
const observerStore = {
store: new Array(),
next(value: number) {
console.log(value)
},
}
/* Works! */
stream$.pipe(tap(_count.next)).subscribe()
```
#### Solutions
1. Pass in the observer object
The straightforward solution would be to simply to pass in the observer object into the `tap` operator:
```tsx
/* This works */
stream$.pipe(
tap(observerStore)
).subscribe()
```
2. Bind the observer to `this`
One could use [`Function.prototype.bind`](https://developer.mozilla.org/en-US/docs/Web/JavaScript/Reference/Global_objects/Function/bind) which is available to the function prototype to bind `this` to the observer object so that when `this` is referenced, the function references the observer instead of the global `this` object:
```tsx
/* _count Subjct */
stream$.pipe(
tap(_count.next.bind(_count))
).subscribe()
/* the observerStore */
stream$.pipe(
tap(observerStore.next.bind(observerStore))
).subscribe()
```
[As the MDN docs state](https://developer.mozilla.org/en-US/docs/Web/JavaScript/Reference/Global_objects/Function/bind), “The **`bind()`** method creates a new function that, when called, has its `this`keyword set to the provided value, with a given sequence of arguments preceding any provided when the new function is called.”
Although both of the solutions work, passing the observer object is much more clear to another reader of the code on what is going on whereas the latter would cause someone who didn't write the code to stop and ask why we are calling `.bind` in the first place.
Happy hacking!
#### References
* [MDN references on `Function.prototype.bind()`](https://developer.mozilla.org/en-US/docs/Web/JavaScript/Reference/Global_objects/Function/bind)
* [RxJs `tap` operator](https://rxjs.dev/api/operators/tap)
* [RxJs Operators](https://rxjs.dev/guide/operators)
## Writing a Custom RxJS Operator

While working with `rxjs`, there are plenty of operators that one can use within the `.pipe` operator of an observable. Just take a look at the api reference here and you'll realize that `rxjs` provides all the operators that you need for most cases.
However, what if you needed to write your custom operator to transform data the way you wanted, or tweak the `captureError` operator to handle the error in a certain way and return something else in case an error happened.
In an application I was working on, for which I was using [Sentry](https://docs.sentry.io/) to handle any errors, I wanted to have the `captureError` to send the error message to Sentry, and return fallback data in case an error happened.
```tsx
import { captureException } from '@sentry/angular'
import { BehaviorSubject, Observable, OperatorFunction, catchError, tap } from 'rxjs'
export function consume(consumer: BehaviorSubject, fallback$: Observable): OperatorFunction {
return (source$: Observable) => {
return source$.pipe(
catchError((error) => {
captureException(error)
return fallback$
}),
tap(consumer),
)
}
}
```
:::tip
Note that the `rxjs` tap operator takes either an observer object. In our case, our `consumer` is a `Behavior Subject` [which is also an observer](https://rxjs.dev/guide/subject).
:::
The operator above is written in the form of [a curried function](https://javascript.info/currying-partials), that accepts two initial inputs: `consumer` - which in this case was a behavior subject that stores the current value in the observable stream, and `fallback$` which is the data to return in case an error happens. If no error happens, the `captureError` rxjs operator isn't called. In all cases, either the data from the observable stream or the fallback data is passed on to the consuming [behavior Subject.](https://rxjs.dev/api/index/class/BehaviorSubject)
And there we have it! Our own custom RxJS operator 🧞♂️
### Links
* [RxJs documentation](https://rxjs.dev/)
* [RxJs Subject reference](https://rxjs.dev/api/index/class/Subject)
* [catch / catchError in RxJs](https://www.learnrxjs.io/learn-rxjs/operators/error_handling/catch)
* [Sentry JavaScript library documentation](https://docs.sentry.io/platforms/javascript/)
* [Currying in JavaScript](https://javascript.info/currying-partials)
## How To: Build an Express GraphQL API in TypeScript

:::tip
So you wanna write a node GraphQL backend in TypeScript? Well, Let's put all the pieces together and begin.
:::
### Initilizing the project
We'll be working in a terminal - be it the standalone teminal - or the integrated terminal in your text editor.
1. Initialize a repository in an empty folder, say, we call ours `express-gql-api`.:
```bash
mkdir express-gql-api
# enter the project folder
cd express-gql-api
```
2. Initialize the folder as a node and git project:
```bash
npm init -y
git init
```
3. Initialize a Readme
Having a Readme is essential for any project - this is the document people will see when they come across your repository in Github.
We'll start off with a simple description but feel free to add more information about your project as you go. `bash echo '# Express GraphQLAPI
in TypeScript' > Readme.md `
4. Initalize the source directory
This is where we will place our `.ts` files
```bash
mkdir src
```
### TypeScript and Project SetUp
TypeScript is usually compiled to JavaScript and which is the code that is actually run.
Assuming you already have the [TypeScript](https://www.typescriptlang.org/id/download) installed, we will write the configuration file that tells the TypeScript compiler how to compile out files into JavaScript:
1. Initialize a `tsconfig.json` file in your root directory from the terminal
```bash
tsc --init
```
2. . Working in the text editor, we will set the following compiler options:
1. `"rootDir"` - this is the directory where the TypeScript compiler will search for `.ts` files to compile into JavaScript. In our case, the root directory is the `src` folder:
```json
{
"compilerOptions": {
//...
"rootDir": "./src"
//...
}
}
```
2. `"outDir"` - this is the directory where the compiled JavaScript will be placed:
In our case, we will call our output directory `"dist"`
```json
{
"compilerOptions": {
//...
"rootDir": "./src",
"ourDir": "./dist"
//...
}
}
```
3. Finally, we will edit the package.json file so that we have a smooth time running the project. Add the following line under script in `package.json`:
```json
"scripts":{
//...
"start" : "nodemon dist/index.js",
//...
}
```
This is the basic setup that we need before we get started
### SetUp
We will be working with a few packages that we need to install:
1. [`express`](https://www.npmjs.com/package/express) - since we are buiding an express server
2. [`express-graphql`](https://www.npmjs.com/package/express-graphql) - this is the express middleware that will allow us to build our graphQL endpoint
3. [`graphql-tools`](https://github.com/ardatan/graphql-tools#readme) - A package that helps build the GraphQL Schema
4. [`mongoose`](https://www.npmjs.com/package/mongoose) - The library that will allow us to connect to a MongoDB database
Before we jump right into installing the packages, let's create a `.gitignore` file at the root folder and add `node_modules` so that git doesn't track npm packages:
```bash
echo node_modules > .gitignore
```
To install all the tools, we can do so in one command:
```bash
npm install -s express express-graphql graphql-tools mongoose nodemon
```
Before we start writing some code, we need to have our TypeScript compiler running so that we can generate the JavaScript files as we go. So, in a separate window, run the typescript compiler with a watch flag:
```bash
tsc -w
```
And now we are ready to build our api
### The API 🥑
Let's add some files to our file structure first:
```
📦express-gql-api
┣ 📂src
┣ 📜.gitignore
┣ 📜Readme.md
┣ 📜package.json
┗ 📜tsconfig.json
```
However, let's add some files in the `src` folder first
Create an empty directory in the `src` folder called `data` - this is where we willl be placing out database connectors, types, schemas and resolver files.
Create the following files to match the following structure:
```
📦express-gql-api
┣ 📂src
┃ ┣ 📂data
┃ ┃ ┣ 📜db.ts
┃ ┃ ┣ 📜resolvers.ts
┃ ┃ ┣ 📜schema.ts
┃ ┃ ┗ 📜types.ts
┃ ┗ 📜index.ts
┣ 📜Readme.md
┣ 📜package.json
┗ 📜tsconfig.json
```
#### Schema Definition
GraphQL requires a schema to be defined. A schema what graphQL uses to know what type of data to expect.
We will define the schema in the `schema.ts` file in the following way: We will use our graphQL endpoint to create and query a user. So we need
to define:
* a `user` type
* a `UserInput` input - that has the same structure as the `User` type
* a `Query` type - where we will define all the queries
* a `Mutation` type - where we will define the mutations
```ts
import { resolvers } from './resolvers'
import { makeExecutableSchema } from 'graphql-tools'
const typeDefs = `
type User {
name: String
username: String
}
input UserInput {
name: String
username: String
}
type Query {
getUser(username: String): User
}
type Mutation{
createUser(user: UserInput): User
}
`
// Build the schema and export
const schema = makeExecutableSchema({ typeDefs, resolvers })
export { schema }
```
#### Definine the type - `type.ts`
```ts twoslash
export class UserType {
constructor(public name: String, public username: String) {}
}
```
#### Connecting the Database
##### Setting up the MongoDB instance 🗄️
Before we move into this step, we will need to first set up our database. One can do so by following this process:
1. create a free MongoDB account [here](https://account.mongodb.com/account/login)
2. Create a **free** cluster.
3. Once the cluster has been created, click `connect` to your cluster. Further instructions can be found [here](https://docs.atlas.mongodb.com/connect-to-cluster/)
4. You will need to add a connection IP address - typically your own IP for development locally
5. create a database user with a username and password - You will need this to login to your database later
6. Proceed to choosing a connection method - in our case we will use the `connect your application` option
7. This will lead us to a page to select our driver and version - which in our case should be `Node.js` Version `3.6 or later`.
8. Copy your connection string somewhere safe that you can edit. You will notice that the username is included in the connection string but you will need to replace the `` with your password and also pick a name for our database
{' '}
Assuming our username was `amani` with password `AEDPfTeq61WH04NL`, and we want our database to be called `bliss`, our connection string would
look like:
```txt
mongodb+srv://amani:AEDPfTeq61WH04NL@cluster0.9ntf0.mongodb.net/bliss?retryWrites=true&w=majority
```
9. Save this connection string somewhere where you can reference it later as we will need it when running our program.
##### Connecting to the Database programmatically - `db.ts`
In the `db.js` file, we will import `mongoose` and then define a new schema for the database - in our case, the only schema we will need is the user schema.
We will then create a new mongoose model that will be exported for use to query the database. Notice that we have set the `connectionString`
variable to an environment variable - this is safer than pasting the connection string right into your code because it makes your database vulnerable.
In our case, will set the connection string to an environment varible when we are ready to run the application.
```ts
import mongoose from 'mongoose'
const Schema = mongoose.Schema
// @ts-ignore
const connectionString: String = process.env.MONGO_DB
// @ts-ignore
mongoose.connect(connectionString, {
useNewUrlParser: true,
useUnifiedTopology: true,
useFindAndModify: false,
useCreateIndex: true
})
const UserSchema = new Schema({
name: String,
username: String
})
const User = mongoose.model('User', UserSchema)
export { User }
```
#### Declaring the resolvers - `resolvers.ts`
The resolvers are the functions that are run whenever the endpoint is run - so you need to define a function for each query and mutation as we will do below:
```ts
import { UserType } from './types'
// import the User from the database
import { User } from './db'
export const resolvers = {
Query: {
//@ts-ignore
getUser: (root, { username }) => {
return User.findOne({ username: username })
.then((user: UserType) => {
return user
})
.catch((error: any) => {
console.log(error.message)
})
}
},
Mutation: {
// @ts-ignore
createUser: async (root, { user }) => {
const newUser = new User({ name: user.name, username: user.username })
await newUser.save()
return newUser
}
}
}
```
### Piece the pie together 🥧 - `index.ts`
Our `index.ts` file is where all the majic happens. We will begin by importing the necessary packages and instantiating a new express app. Then we will initialize the connection to the database and attach the `grapqlHTTP` middleware function with our schema and `graphiql` - which we can use to explore the api:
```ts
import express from 'express'
import { graphqlHTTP } from 'express-graphql'
import { schema } from './data/schema'
// Initialize app
const app = express()
require('./data/db')
// the graphQL endpoint at /graphql.
app.use('/graphql', graphqlHTTP({ schema: schema, graphiql: true }))
app.get('*', (req, res) => {
res.json({ message: 'Welcome to the api' })
})
const PORT = 7000
app.listen(PORT, () => {
console.log(`api is running on port ${PORT}`)
})
```
### Running the server
Before we run the server, we will need to add our mongoDB connection string to the environment variables:
```bash
export MONGO_DB='mongodb+srv://amani:AEDPfTeq61WH04NL@cluster0.9ntf0.mongodb.net/bliss?retryWrites=true&w=majority'
```
Now, we are ready to run the server 🚀
```bash
npm run start
```
And we can run the server and explore our api.
Here's an example of a mutation that you can make with the api:
#### Mutation
We can add a user by making a mutation on the api:
```txt
mutation createUser ($input:UserInput){
createUser(user:$input) {
name
username
}
}
```
We can then pass in the user input using the query variables:
```txt
{
"input": {
"name": "Laurence",
"username": "laudebugs"
}
}
```
Here's how the mutation looks like:
 #### Query
If we were to then ask the api for a certain user, we can make the query by:
```txt
query {
getUser (username:"laudebugs"){
name
}
}
```
You can check out the [repo here](https://github.com/laudebugs/express-gql-api)
#### Common Issues that you may run into:
1. **IP isn't whitelisted**: If you're running into this issue, it may be the case that your ip address has changed and you need to add your current IP to be able to connect.
2. **Could not find a declaration file for 'express'**
Install the declaratio file for `express`:
```bash
npm install --save-dev express
```
### Further Reading
* [GraphQL quick tip: How to pass variables in GraphiQL](https://medium.com/atheros/graphql-quick-tip-how-to-pass-variables-into-a-mutation-in-graphiql-23ecff4add57)
## Organizing Codebases with Automation Tools

:::tip
Over the past couple of months, shuffling between different projects, and also work, I found it particularly useful to have some standard
way to organize a codebase - even if each of the projects differed in some way or another. This little guide is what I come back to
whenever I'm scaffolding a new project.
:::
### Tools Mentioned in this guide
* [Husky](https://typicode.github.io/husky/#/)
* [Prettier](https://prettier.io/)
* [Eslint](https://eslint.org/)
* [Commitlint](https://www.npmjs.com/package/@commitlint/cli)
* [Commitizen](https://www.npmjs.com/package/commitizen)
* [Standard Version](https://www.npmjs.com/package/standard-version)
#### [Husky](https://typicode.github.io/husky/#/)
Husky is used to make our commits more cool, and powerful to help development easier. In this guide, husky will be used to format both the files (source code) and commits themselves before they are executed (thus "pre" in the pre-commit hooks).
[Read more here.](https://typicode.github.io/husky/#/)
* [Initialize Husky:](https://typicode.github.io/husky/#/?id=automatic-recommended)
```bash
# install husky
npm install -D husky
# initialize
npx husky-init
```
### Prettier & EsLint
If we would like to have our commits automatically format our code on every commit - to ensure that the codebase follows a specified standard, defined in the `prettierrc` file, then this is a handy tool to have.
1. Add Prettier and eslint to your project:
```bash
# prettier
npm install -D prettier
# eslint
npm install -D eslint
```
2. Add a prettier [config file](https://prettier.io/docs/en/configuration.html) to the repository - named `.prettierrc.json` (or following the [specified format](https://prettier.io/docs/en/configuration.html) for configuration files:
```json
{
"trailingComma": "all",
"tabWidth": 4,
"semi": false,
"singleQuote": true
//more rules below
}
```
3. Initialize EsLint:
```bash
npx eslint --init
```
4. Set up ESLint to work with prettier
Add prettier plugin to the eslint configuration file:
```json
// .eslintrc.json
{
"extends": [
// other extensions,
"prettier"
]
}
```
Now, you can specify prettier rules to work with your linter and not have both ESLint and Prettier enforcing different styles
5. Add [Prettier Pre-commit Hook](https://prettier.io/docs/en/precommit.html#option-2-pretty-quickhttpsgithubcomazzpretty-quick):
```bash
npm install -D pretty-quick
npx husky set ./husky/pre-commit "npx pretty-quick --staged"
```
> There are more ways to configure your prettier pre-commit hooks [found here](https://prettier.io/docs/en/precommit.html#docsNav).
### [CommitLint](https://github.com/conventional-changelog/commitlint) & CommitLint Hooks
Commitlint is a tool that lints commits - and make sure they are up to standard.
We will also add a husky pre-commit hook that lints our commit messages
1. [Install Commitlint](https://github.com/conventional-changelog/commitlint#getting-started)
```bash
npm install -D @commitlint/config-conventional @commitlint/cli
# Configure commitlint to use conventional config
echo "module.exports = {extends: ['@commitlint/config-conventional']}" > commitlint.config.js
```
2. . Add the commitlint hooks:
```bash
# Add hook
npx husky add .husky/commit-msg 'npx --no -- commitlint --edit "$1"'
```
3. Add a husky pre-commit hook config to the package.json
```json
"husky": {
"hooks": {
"prepare-commit-msg": "exec < /dev/tty && git cz --hook || true"
}
}
```
### [Commitizen](https://github.com/commitizen/cz-cli)
Commitizen is a command line interface tool that can be helpful in making commits a pretty-forward process following your linting rules.
1. Install the tool
```bash
npm install -D commitizen
```
2. Add a script to the package.json to easily run commitizen:
```json
{
"scripts": {
"commit": "cz"
}
}
```
An Example use:
#### Query
If we were to then ask the api for a certain user, we can make the query by:
```txt
query {
getUser (username:"laudebugs"){
name
}
}
```
You can check out the [repo here](https://github.com/laudebugs/express-gql-api)
#### Common Issues that you may run into:
1. **IP isn't whitelisted**: If you're running into this issue, it may be the case that your ip address has changed and you need to add your current IP to be able to connect.
2. **Could not find a declaration file for 'express'**
Install the declaratio file for `express`:
```bash
npm install --save-dev express
```
### Further Reading
* [GraphQL quick tip: How to pass variables in GraphiQL](https://medium.com/atheros/graphql-quick-tip-how-to-pass-variables-into-a-mutation-in-graphiql-23ecff4add57)
## Organizing Codebases with Automation Tools

:::tip
Over the past couple of months, shuffling between different projects, and also work, I found it particularly useful to have some standard
way to organize a codebase - even if each of the projects differed in some way or another. This little guide is what I come back to
whenever I'm scaffolding a new project.
:::
### Tools Mentioned in this guide
* [Husky](https://typicode.github.io/husky/#/)
* [Prettier](https://prettier.io/)
* [Eslint](https://eslint.org/)
* [Commitlint](https://www.npmjs.com/package/@commitlint/cli)
* [Commitizen](https://www.npmjs.com/package/commitizen)
* [Standard Version](https://www.npmjs.com/package/standard-version)
#### [Husky](https://typicode.github.io/husky/#/)
Husky is used to make our commits more cool, and powerful to help development easier. In this guide, husky will be used to format both the files (source code) and commits themselves before they are executed (thus "pre" in the pre-commit hooks).
[Read more here.](https://typicode.github.io/husky/#/)
* [Initialize Husky:](https://typicode.github.io/husky/#/?id=automatic-recommended)
```bash
# install husky
npm install -D husky
# initialize
npx husky-init
```
### Prettier & EsLint
If we would like to have our commits automatically format our code on every commit - to ensure that the codebase follows a specified standard, defined in the `prettierrc` file, then this is a handy tool to have.
1. Add Prettier and eslint to your project:
```bash
# prettier
npm install -D prettier
# eslint
npm install -D eslint
```
2. Add a prettier [config file](https://prettier.io/docs/en/configuration.html) to the repository - named `.prettierrc.json` (or following the [specified format](https://prettier.io/docs/en/configuration.html) for configuration files:
```json
{
"trailingComma": "all",
"tabWidth": 4,
"semi": false,
"singleQuote": true
//more rules below
}
```
3. Initialize EsLint:
```bash
npx eslint --init
```
4. Set up ESLint to work with prettier
Add prettier plugin to the eslint configuration file:
```json
// .eslintrc.json
{
"extends": [
// other extensions,
"prettier"
]
}
```
Now, you can specify prettier rules to work with your linter and not have both ESLint and Prettier enforcing different styles
5. Add [Prettier Pre-commit Hook](https://prettier.io/docs/en/precommit.html#option-2-pretty-quickhttpsgithubcomazzpretty-quick):
```bash
npm install -D pretty-quick
npx husky set ./husky/pre-commit "npx pretty-quick --staged"
```
> There are more ways to configure your prettier pre-commit hooks [found here](https://prettier.io/docs/en/precommit.html#docsNav).
### [CommitLint](https://github.com/conventional-changelog/commitlint) & CommitLint Hooks
Commitlint is a tool that lints commits - and make sure they are up to standard.
We will also add a husky pre-commit hook that lints our commit messages
1. [Install Commitlint](https://github.com/conventional-changelog/commitlint#getting-started)
```bash
npm install -D @commitlint/config-conventional @commitlint/cli
# Configure commitlint to use conventional config
echo "module.exports = {extends: ['@commitlint/config-conventional']}" > commitlint.config.js
```
2. . Add the commitlint hooks:
```bash
# Add hook
npx husky add .husky/commit-msg 'npx --no -- commitlint --edit "$1"'
```
3. Add a husky pre-commit hook config to the package.json
```json
"husky": {
"hooks": {
"prepare-commit-msg": "exec < /dev/tty && git cz --hook || true"
}
}
```
### [Commitizen](https://github.com/commitizen/cz-cli)
Commitizen is a command line interface tool that can be helpful in making commits a pretty-forward process following your linting rules.
1. Install the tool
```bash
npm install -D commitizen
```
2. Add a script to the package.json to easily run commitizen:
```json
{
"scripts": {
"commit": "cz"
}
}
```
An Example use:
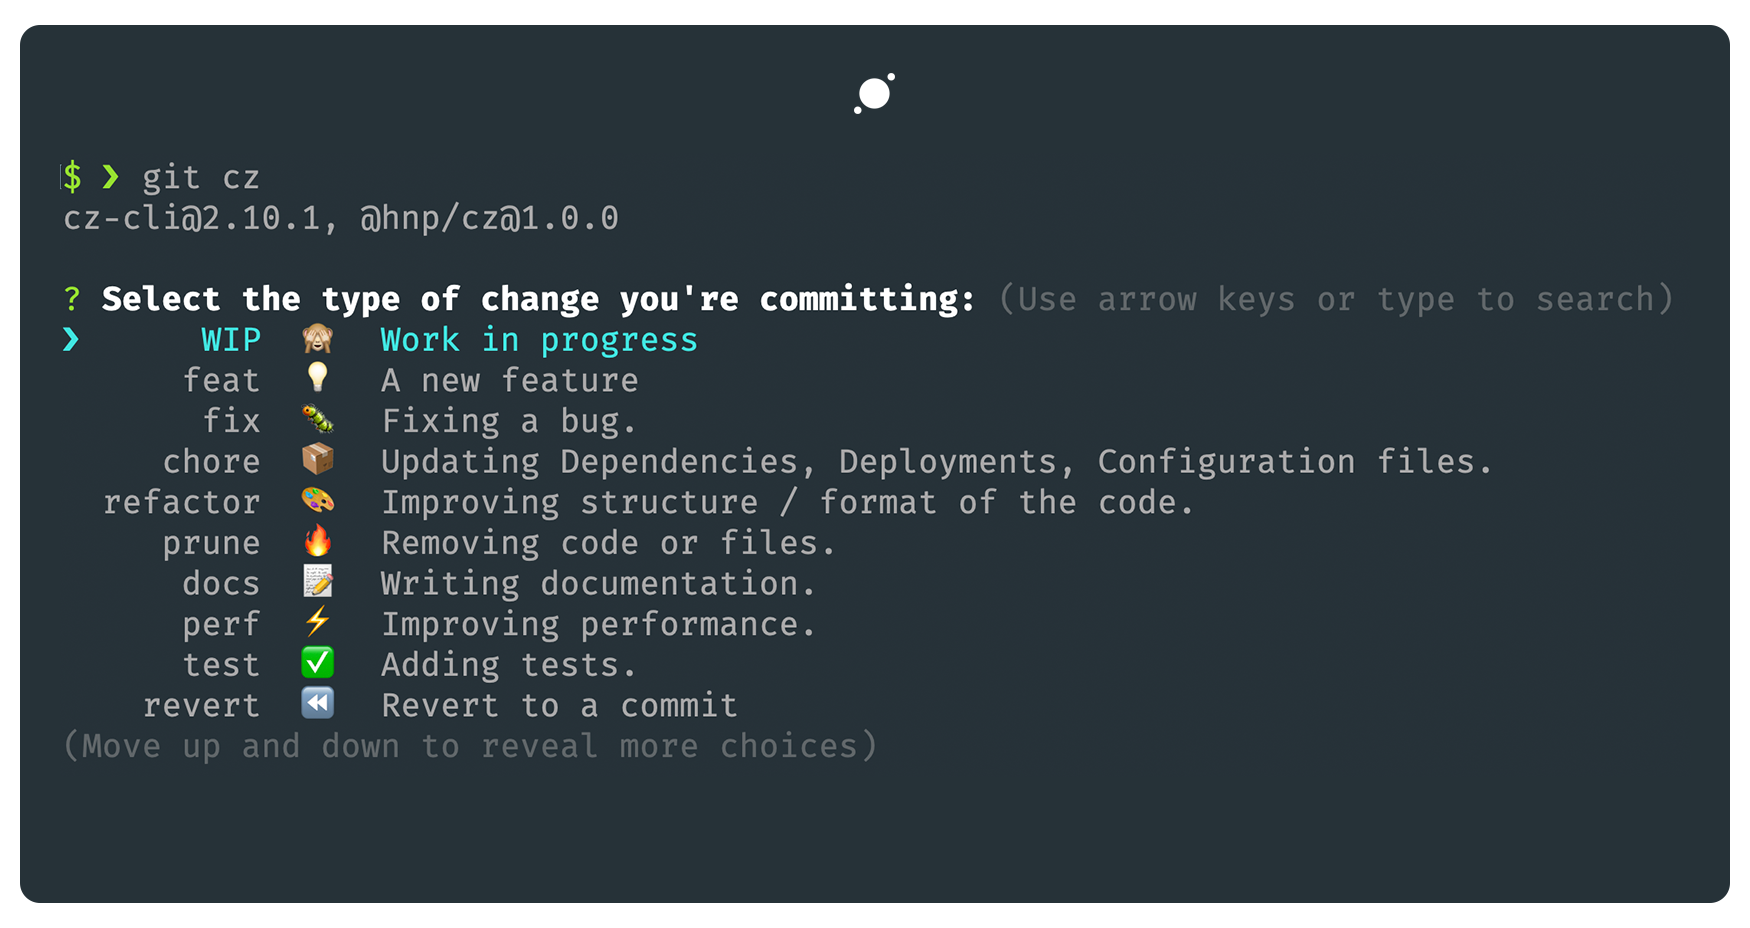 [source](https://www.npmjs.com/package/@hnp/cz/v/1.0.7)
:::tip
You can customize the fields available in your commitizen CLI by following this guide.
:::
### Conventional Changelog
This will assist in generating changelogs automatically from commits:
1. Initialize:
```bash
npx commitizen init cz-conventional-changelog -D --save-exac
```
### Versioning and Release
We can use [Standard Version](https://github.com/conventional-changelog/standard-version#standard-version) to automatically generate versions for out projects.
1. Install Standard Version
```bash
npm install -D standard-version
```
2. Add scripts to easily run releases and generate changelogs automaticallly:
```json
{
"scripts": {
"release": "standard-version"
}
}
```
Another option to Standard version is [`semantic-release`](https://github.com/semantic-release/semantic-release)
You can now run your first release by:
```bash
npm run release
```
> Plug: Here is an example of a [changelog for my website](https://www.laudebugs.me/changelog).
If you create a release - then you can push that release by running:
```bash
git push --follow-tags
```
[source](https://www.npmjs.com/package/@hnp/cz/v/1.0.7)
:::tip
You can customize the fields available in your commitizen CLI by following this guide.
:::
### Conventional Changelog
This will assist in generating changelogs automatically from commits:
1. Initialize:
```bash
npx commitizen init cz-conventional-changelog -D --save-exac
```
### Versioning and Release
We can use [Standard Version](https://github.com/conventional-changelog/standard-version#standard-version) to automatically generate versions for out projects.
1. Install Standard Version
```bash
npm install -D standard-version
```
2. Add scripts to easily run releases and generate changelogs automaticallly:
```json
{
"scripts": {
"release": "standard-version"
}
}
```
Another option to Standard version is [`semantic-release`](https://github.com/semantic-release/semantic-release)
You can now run your first release by:
```bash
npm run release
```
> Plug: Here is an example of a [changelog for my website](https://www.laudebugs.me/changelog).
If you create a release - then you can push that release by running:
```bash
git push --follow-tags
```
### Update (25th Feb 2022)
I ended up writing a simple npm package to automate setting this whole process up for new projects
You can find the package [here](https://www.npmjs.com/package/organize-codebase).
### References & Resources
#### Articles
* [How to control your deployments and versioning with semantic-release & friends](https://blog.logrocket.com/never-guess-about-project-history-again-31f65091f668/)- (logrocket)
* [Commit Standard and Semantic Versioning for any project](https://dev.to/migu3l/commit-standard-and-semantic-versioning-for-any-project-1ihc) - (dev)
* [Automate Semantic Versioning with Conventional Commits ](https://medium.com/@jsilvax/automate-semantic-versioning-with-conventional-commits-d76a9f45f2fa)(medium)
* [Automatically generate and release a changelog using Node.js](https://blog.logrocket.com/automatically-generate-and-release-a-changelog-with-node-js/) (logrocket)
* [Development: How to adapt a custom conventional changelog](https://medium.com/vlad-arbatov/development-how-to-adapt-a-custom-conventional-changelog-33ff3b13c832) (medium)
* [Make everyone in your project write beautiful commit messages using commitlint and commitizen](https://dev.to/sohandutta/make-everyone-in-your-project-write-beautiful-commit-messages-using-commitlint-and-commitizen-1amn) - loved this one!
#### Documentation
* [Husky](https://typicode.github.io/husky/#/)
* [ESLint - Getting started](https://eslint.org/docs/user-guide/getting-started)
* [Prettier - Pre-Commit Hooks](https://prettier.io/docs/en/precommit.html#docsNav)
* [Commitizen](https://github.com/commitizen/cz-cli)
* [Commitlint](https://github.com/conventional-changelog/commitlint#getting-started)
* [Conventional Changelog](https://github.com/conventional-changelog/standard-version#standard-version)
* [Semantic Release](https://github.com/semantic-release/semantic-release)
#### Other Useful Links
* [Gitmoji](https://gitmoji.dev/)
## How To: Use your Repo as a Database with the Github GraphQL API

:::tip
You can sort of use your Github repository as a database for your blog posts by leveraging the Github Graph QL API 😱.
:::
### Motivation
The Github GraphQL API provides a lot more capabilities than I can cover in one *snack*.
However, in searching for a way to share the small lessons that I pick up week in week out, I knew that publishing through [Contentful](https://www.contentful.com/), which it the CMS, I use for the main content in my blog site, was a little too much to share easily and quicly.
Posting on Github and sharing that as [gists](https://gist.github.com/laudebugs) seemed like I would be writing too much for a gist that is supposed to be a short code snippet - which was the original title of this section. Although [MichaelCurrin](https://gist.github.com/MichaelCurrin/6777b91e6374cdb5662b64b8249070ea) proves me otherwise! His article is what got me goint in the first place!
### Querying the GraphQL API for posts.
In order to use the Github GraphQL API, you can either use the [API explorer](https://docs.github.com/en/graphql/overview/explorer) by logging in through your github account, use an api testing tool like [Insomnia](https://support.insomnia.rest/article/61-graphql), or you can use it programmatically.
Since I was using the Apollo Graph QL library to query my backend - that helps me manage comments and likes, I began to do a little research on how to query the Github GraphQL API. I will link the articles below.
This [stack overflow](https://stackoverflow.com/questions/58576940/how-to-handle-authorization-header-with-apollo-graphql) answered how to add an authorization header to an Apollo Client Query.
### The Query
We will be using writing our query in a node.js environment using both [Apollo Client](https://github.com/apollographql/apollo-client) and [Axios](https://github.com/axios/axios)
#### 1. Obtain your github public access token
The only permission you need for this task is `public_repo` under `repo`:
* [ ] repo
* [x] public\_repo
Give your token a name and will look something like this:
```txt
89fdd35bcd40787b519e97462cec0f9975a66a58
```
Note the token above is revoked and you'll need to generate yours. Once you're done, we're ready for the next step!
#### 2. Querying the repo
In my case, I will be looking for files in my repository called `articles`. If you'd like to use your own repository, simply make note of your repository name.
#### Using the Apollo Client
1. Install the Apollo client
```bash
npm install @apollo/client graphql
```
2. Working in your js file, import the Apollo client and a few methods that we will make use of:
```js twoslash
import { ApolloClient, InMemoryCache, gql, ApolloLink, HttpLink } from '@apollo/client'
```
3. Initialize a new apollo client with the github graphQL endpoint and your token
```js twoslash
const token = '89fdd35bcd40787b519e97462cec0f9975a66a58'
const endpoint = 'https://api.github.com/graphql'
// Add the toke to the header of your client for all your requests
const githubLClient = new ApolloClient({
uri: endpoint,
headers: {
authorization: `Bearer ${token}`
},
cache: new InMemoryCache({
addTypename: false
})
})
```
4. Make the query
I referenced github user [int128's gist](https://gist.github.com/int128/b0e75e3043c8a33808cea0089d988ed3) for the structure of the graphQl query:
```js twoslash
let request = await githubClient.query({
query: gql`
{
repository(owner: "laudebugs", name: "articles") {
defaultBranchRef {
target {
... on Commit {
file(path: "/") {
type
object {
... on Tree {
entries {
name
object {
... on Blob {
text
}
}
}
}
}
}
}
}
}
}
}
`
})
```
5. Parse your output to obtain the file's contents.
By making this same query on Github's GraphQL explorer, the data returned, which is essentially a json object, at the time of writing this, looks like this:
```json
{
"data": {
"repository": {
"defaultBranchRef": {
"target": {
"file": {
"type": "tree",
"object": {
"entries": [
{
"name": "QraphQL.md",
"object": {
"text": "# Exploring GraphQL\n"
}
},
{
"name": "README.md",
"object": {
"text": "# Articles"
}
}
]
}
}
}
}
}
}
}
```
So, if to obtain the entries, we would access them by:
```js twoslash
let result = request.data.repository.defaultBranchRef.target.file.type.object.entries
```
##### Using Axios
1. Install the [axios npm package](https://github.com/axios/axios)
```bash
npm install axios
```
2. Import exios into your node project:
```js twoslash
import axios from 'axios'
```
3. initialize an authentication object and the query string that will be attatched to your request
```js twoslash
// The Authorization in the header of the request
const oauth = { Authorization: 'bearer ' + token }
// The Query String
const query = `
{
repository(owner: "laudebugs", name: "articles") {
defaultBranchRef {
target {
... on Commit {
file(path: "/") {
type
object {
... on Tree {
entries {
name
object {
... on Blob {
text
}
}
}
}
}
}
}
}
}
}
}
`
```
4. Make the request, adding in the query and the header
```js twoslash
let request = axios.post(githubUrl, { query: query }, { headers: oauth })
```
5. Parse your output as above:
```js twoslash
let result = request.data.repository.defaultBranchRef.target.file.type.object.entries
```
### Referenced articles
* [Graph QL query](https://gist.github.com/MichaelCurrin/6777b91e6374cdb5662b64b8249070ea) for getting files.
* [GraphQL Queries using Insomnia](https://support.insomnia.rest/article/61-graphql)
* How to create a personal access token from your github account: [Creating a personal access token](https://docs.github.com/en/github/authenticating-to-github/creating-a-personal-access-token)
* [Set Authorization Header with Apollo Client](https://medium.com/risan/set-authorization-header-with-apollo-client-e934e6517ccf)
* [How to handle authorization header with apollo graphql? - Stack Overflow](https://stackoverflow.com/questions/58576940/how-to-handle-authorization-header-with-apollo-graphql)
* [Get started with GitHub GraphQL API 👨🔬](https://dev.to/thomasaudo/get-started-with-github-grapql-api--1g8b) on Dev
## Kenya Web Project

### Foreground
The internet is a vast “land” with plenty of room to create, share and find content. Internet usage in Kenya is increasing by the year. COVID-19 brought to the forefront, the importance of having an online presence. Companies like Amazon, that were internet-first, widened their market share of internet sales and became more relevant. Those companies that didn't have an online presence realized that they needed to adapt quickly to the times. Even people realized that they needed to build an online presence to showcase their work or seek jobs.
In developing countries like Kenya, with companies shifting online, there is a growing need to track these trends. However, data is still expensive for the average Kenyan even though data consumption in the country has been increasing by the year. Therefor, in as much as companies are moving online, they need to take into consideration this very fact that accessing websites should not require a large amount of data – say more than 2MB (to be revised later). And web developers need to be creative in ways that they can reduce data consumption on subsequent website visits to the sites they build. For instance, through caching or giving users a low-data version of their site once they land on the page before loading any subsequent content.
### Conceptualization
Through this project, I would like to accomplish two things:
* Create a directory of Kenyan websites - websites with extensions “.co.ke” or “.ke” or that include “kenya” within the domain name.
* Of the collected sites, note how much data is downloaded on the landing page of the site and organize this data into a repository.
### Data Collection and Preparation
How many websites can I find by randomly searching common words and the big companies in Kenya?
After considering this, I searched the internet to try to find a difinitive list of websites in Kenya. To find this list, I would have to contact organizations like The Kenya Network Information Centre (KENIC) to obtain this information. And although this seemed like the route to go, I also found a list of the top 500 websites in Kenya provided by Alexa and figured that this list would be more useful to use as a baseline of websites in Kenya. And as the list showed, there's a large number of domains that do not end with .co.ke or .ke that Kenyans use. After signing up for the free trial, I parsed the data to this json file using a simple java script.
Considering all the information that lighthouse provided, two metrics seemed important: the performance of the site as well as the amount of data downloaded when a user accesses the website., i.e. Total size.
Two metrics: Performance and total size downloaded on page load
The size will vary from device to device since mobile devices might have cached the websites before or CDN's might be used to deliver a faster and smaller payload.
#### Why lighthouse?
Google provides Lighthouse as a developer tool to generate a report on a website. The tool is also available as a commandline interface tool. However, I wanted to use the tool as part of a node.js project. Therefore, I stumbled on this project by Sahava on github from which I borrowed heavily and modified to my own use.
Generating the Reports
Since my computer crawled at even the thought of running lighthouse on 500 websites, I decided to run the runLightHouse.js script on AWS.
Here are the steps for creating an AWS instance:
After Creating an Amazon AWS account,
Create an EC2 instance. You can proceed with launching an instance that contains the free tier.
```
Launch instance > Ubuntu 20.04 (with Free tier eligible) > General Purpose Instance Type > Choose an Existing Key-pair for ssh into your instance or download a new instance >Launch instance
```
I however created an instance type with a GPU (just for fun) and to perform lighthouse processes fast. (this cost a couple of cents/hr)
SSH into your instance:
```bash
# move your .pem file into the come folder
# Assuming you downloaded the .pem file to the downloads folder:
# cd into the root directory
cd
# check whether a .ssh folder exists
ls -al
# if it doesn't, create the folder
mkdir .ssh
#move the .pem file into the .ssh folder. Here assume I call my .pem file myKeyPair
mv [path where the .pem file exists]/myKeyPair.pem myKeyPair.pem
# change the permissions of the .pem file
chmod 400 .ssh/myKeyPair.pem
```
Copy your Public DNS (IPv4) from your AWS instance - this is usually located at your instances page when you click on your instance
SSH into your instance
```bash
# replace [my public ip with the actual ip]
ssh -i ~/.ssh/myKeyPair.pem ubuntu@[Public DNS (IPv4)]
# you may be asked whether to type yes or no to proceed. Type yes to proceed
# Prepare the server to run your script
install git
sudo apt install git -y
# Install latest version of npm
curl -sL https://deb.nodesource.com/setup_10.x | sudo -E bash
sudo apt-get install -y nodejs
# Install Chrome. I referenced this article
# Download Google chrome
wget https://dl.google.com/linux/direct/google-chrome-stable_current_amd64.deb
# install google chrome
sudo apt install ./google-chrome-stable_current_amd64.deb
```
#### Running the script
```bash
# Clone the repo
git clone https://github.com/laudebugs/kenya-web-project.git
# enter project folder
cd kenya-web-project
# Install packages
npm install
# Run the script
node generateReports.js
# Exit the AWS instance
```
### Update
I tried running the script on an amazon linux server but there was always an error generated, so I switched to using an ubuntu 20.04 instance.
Below are the instructions fro setting up and to ssh into an Amazon linux ec2 instance:
After Creating an Amazon AWS account,
Create an EC2 instance. You can proceed with launching an instance that contains the free tier.
```text
Launch instance > Amazon Linux (with Free tier eligible) > General Purpose Instance Type > Choose an Existing Key-pair for ssh into your instance or download a new instance >Launch instance
```
I however created an instance type with a GPU (just for fun) and to perform lighthouse processes fast. (this cost a couple of cents/hr)
SSH into your instance:
````bash
# move your .pem file into the come folder
# Assuming you downloaded the .pem file to the downloads folder:
# cd into the root directory
cd [root directory]
# check whether a .ssh folder exists
ls -al
# if it doesn't, create the folder
mkdir .ssh
#move the .pem file into the .ssh folder. Here assume I call my .pem file myKeyPair
mv [path where the .pem file exists]/myKeyPair.pem myKeyPair.pem
Change the permissions of the .pem file
```bash
chmod 400 .ssh/myKeyPair.pem
````
Copy your Public DNS (IPv4) from your AWS instance - this is usually located at your instances page when you click on your instance
````
SSH into your instance
```bash
# replace [my public ip with the actual ip]
ssh -i ~/.ssh/myKeyPair.pem ec2-user@[Public DNS (IPv4)]
````
You may be asked whether to type yes or no to proceed. Type yes to proceed
```bash
# Prepare the server to run your script
# install git
sudo yum install git -y
```
install npm using Amazon's instructions
```bash
# Install latest version of npm
npm install -g npm@latest
# Install Chrome. I referenced this article
curl https://intoli.com/install-google-chrome.sh | bash
```
##### Running the script
````bash
#Clone the repo
git clone https://github.com/laudebugs/kenya-web-project.git
# enter project folder
```bash
cd kenya-web-project
# Install packages
npm install
# Exit the AWS instance
exit
````
### Analysis
Having obtained two additional metrics of each website, i.e. the performance and size of page downloaded, then we can plot several graphs to gauge how one metric affects the other.
In order to answer questions that the data presented, there still remained missing pieces of information that would enable me to analyze the data accurately. With metrics such as performance, size of webpage downloaded and average time spent on a website, we could take a look at the general trend of the top websites in Kenya as shown below.
 The optimal size of a web page is 0 - 1 MB downloaded once a use logs onto a site. This is of course, not taking into account cached resources that might reduce the size of the page downloaded.
 The modal time spent on a website by Kenyans is 3 minutes with the average coming to 7.2682 minutes.
### Postscript
In analyzing the dataset, there's a temptation to draw immediate conclusions from the various datapoints such as comparing the time spent and how this changes based on the size of the web page downloaded when a user accesses the website. However, this analysis doesn't take into account the fact that different websites serve different functions. For instance, a person logging into the Kenya Revenue Authority website would perhaps use the site for a specific predetermined use case while a person using YouTube might not have a goal in mind while using the site. And therefore one would need to make assumptions to immediately draw conclusions from the data. On modelling the graph, the size of the page downloaded doesn't relate to how much time is spent on the site.
Further information is needed to ask deeper questions from the dataset. One such piece is the genre of the website which would be able to draw distinctions between the different websites and make comparisons within websites of a certain type.
As of now, the dataset is freely available to use and for more research to be done. Especially at a time when the internet is crucial to keep systems moving during Covid-19, we need to examine more closely how Kenyans use the internet.
Hiccups along the way
In generating the lighthouse reports for the site, I decided to splice the list of websites into groups of 30 websites at a time - because even AWS servers weren't running all the reports smoothly. At other times, I ran 50 reports at a time. However, while doing this, I realised I skipped over close to 70 websites spread over my input set of 500. And so, I wrote a small python script to find the missing sites.
I had to manually run the website Bet365.com using the lighthouse cli because the node script kept timing out
#### After installing lighthouse
`npm install -g lighthouse`
```bash
lighthouse https://www.bet365.com/ --quiet --output json --output-path ./www_Bet365_com.json
```
#### References
* [Multisite Lighthouse](https://github.com/sahava/multisite-lighthouse)
* [Top Sites in Kenya](https://www.alexa.com/topsites/countries/KE)
* Google Chrome Lighthouse [Github Repository](https://github.com/GoogleChrome/lighthouse)
-> Checkout the [Github Repository](https://github.com/laudebugs/kenya-web-project)
The modal time spent on a website by Kenyans is 3 minutes with the average coming to 7.2682 minutes.
### Postscript
In analyzing the dataset, there's a temptation to draw immediate conclusions from the various datapoints such as comparing the time spent and how this changes based on the size of the web page downloaded when a user accesses the website. However, this analysis doesn't take into account the fact that different websites serve different functions. For instance, a person logging into the Kenya Revenue Authority website would perhaps use the site for a specific predetermined use case while a person using YouTube might not have a goal in mind while using the site. And therefore one would need to make assumptions to immediately draw conclusions from the data. On modelling the graph, the size of the page downloaded doesn't relate to how much time is spent on the site.
Further information is needed to ask deeper questions from the dataset. One such piece is the genre of the website which would be able to draw distinctions between the different websites and make comparisons within websites of a certain type.
As of now, the dataset is freely available to use and for more research to be done. Especially at a time when the internet is crucial to keep systems moving during Covid-19, we need to examine more closely how Kenyans use the internet.
Hiccups along the way
In generating the lighthouse reports for the site, I decided to splice the list of websites into groups of 30 websites at a time - because even AWS servers weren't running all the reports smoothly. At other times, I ran 50 reports at a time. However, while doing this, I realised I skipped over close to 70 websites spread over my input set of 500. And so, I wrote a small python script to find the missing sites.
I had to manually run the website Bet365.com using the lighthouse cli because the node script kept timing out
#### After installing lighthouse
`npm install -g lighthouse`
```bash
lighthouse https://www.bet365.com/ --quiet --output json --output-path ./www_Bet365_com.json
```
#### References
* [Multisite Lighthouse](https://github.com/sahava/multisite-lighthouse)
* [Top Sites in Kenya](https://www.alexa.com/topsites/countries/KE)
* Google Chrome Lighthouse [Github Repository](https://github.com/GoogleChrome/lighthouse)
-> Checkout the [Github Repository](https://github.com/laudebugs/kenya-web-project)